
This is the fourth article in a series about how to build-out a simple vCAC 6 installation to a distributed model.
By the end of this post we will have deployed a second vCAC Appliance, clustered it with the first appliance and registered the load balanced URL with the Identity Appliance. This will mean logging on to https://vcloud.definit.local/shell-ui-app will be successful.

vCAC deployment with clustered and load balanced vCAC Appliances
An overview of the steps required are below:
- Issue and install certificates
- Deploy an external vPostgres appliance and migrate the vCAC database
- Configure load balancing
- Deploy a second vCAC appliance and configure clustering
- Install and configure additional IaaS server
- Deploy vCenter Orchestrator Appliance cluster
Deploying a secondary vCAC Appliance OVF#
I’m not going to run through the steps required to deploy the OVF as they’re really quite simple, and I am assuming you’ve already done it! Some point to double check though
- Create DNS A and PTR records for the IP address assigned to the new appliance (e.g. vCAC-App-02.definit.local)
- Configure NTP to sync with the same source as all other components.
Configure the primary vCAC Appliance for Clustering#
First step should be to double-check that NTP is configured – time sync is critical for distributed applications, especially those doing encryption and authentication. This is easily configured using the web admin console on port 5480.
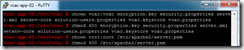
Log onto the primary appliance using SSH, and the root user.
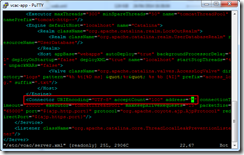
Edit the /etc/vcac/setenv-core file using vi – ignore the read only warnings for now.
vi /etc/vcac/setenc-core
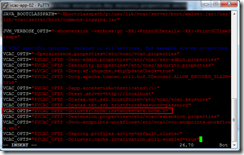
Move to the end of the file, and then use the Insert key to enter editing mode. Add the following lines after the last line in the file:
VCAC_OPTS="$VCAC_OPTS -Dspring.profiles.active=default,cluster"

VCAC_OPTS="$VCAC_OPTS -Dcluster.cache.invalidation.poll.enabled=true"
Press Escape to exit the editing mode and then type “:wq!” to write (w), quit (q) and force it to write over the read only file.

Next, edit /etc/vcac/server.xml
vi /etc/vcac/server.xml
Find the line near the bottom starting “<Connector” and modify it to replace address=”localhost” to address=”*”
Use “:wq!” to write out the file and quit.
The VMware documentation is not exactly clear here, the next step isn’t an optional test, it’s an important step to ensure that the encryption key value is correct. My first reading of the document was that it was a verification test – that’s not the case.
test -s /etc/vcac/encryption.key || dd if=/dev/random of=/etc/vcac/encryption.key bs=48 count=1

Configure the CAFE Hostname and re-register with SSO#
The CAFE hostname needs to be modified to ensure that when the vCAC Appliance hands off to the Identity Appliance for authentication it knows to come back to the load balanced URL rather than the vCAC appliance’s FQDN. E.g. if the CAFE name is vcac-app-01.definit.local, when you log onto the /shell-ui-app it passes you to the ID appliance, which then authenticates you and hands you back to vcac-app-01.definit.local – not the load balancer. If you hit vcac-app-01 from the load balanced URL, the same thing will happen – unless you change the CAFE hostname to the load balanced URL. Simples right?!
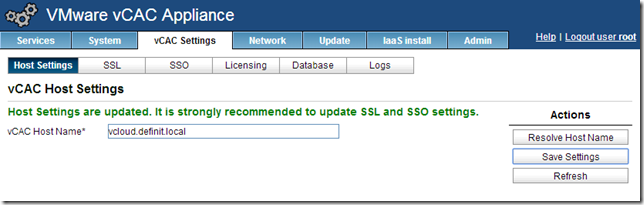
Log onto the web management console of your primary appliance (https://vcac-app-01.definit.local:5480) and navigate to vCAC Settings > Host Settings. Enter the load balanced URL (e.g. vcloud.definit.local) and click Save Settings.
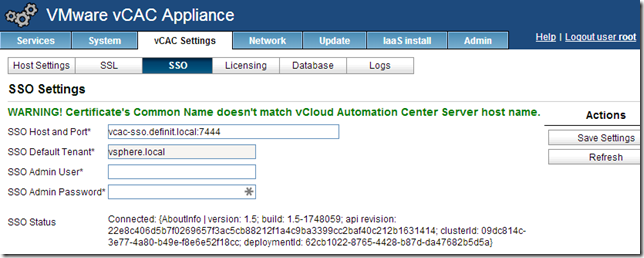
Since we’ve already installed a wildcard SSL certificate, we don’t need to update the SSL settings – but we do need to re-register with the SSO, updating the CAFE hostname that’s registered. Click SSO and enter the SSO Admin User and Password, then click “Save Settings” to re-register. Check the presented certificate and OK any warnings.
Be patient here, it can take a long time! (in my lab >5m is not unusual). Eventually you’ll see that it’s registered, and you can safely ignore the certificate mismatch message since it’s a wildcard.
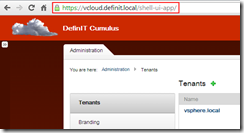
At this point we can log into the /shell-ui-app via the load balanced URL and test that it hands back to the load balancer after SSO authentication.
Configure secondary vCAC Appliance for clustering#
Next we need to copy the configuration files from the primary server to the secondary server to ensure they’re set up identically. This negates the need to do any configuration of database settings, SSO,
While still logged into the primary vCAC Appliance via SSH, and in the /etc/vcac directory:
scp encryption.key security.properties server.xml setenv-core solution-users.properties vcac.keystore vcac.properties [email protected]:/etc/vcac/
scp /etc/apache2/server.pem [email protected]:/etc/apache2/

Log onto the secondary vCAC Appliance (vcac-app-02.definit.local) and run the following to ensure the file ownership and permissions are correct:
cd /etc/vcac/
chown vcac:vcac encryption.key security.properties server.xml setenv-core solution-users.properties vcac.keystore vcac.properties
chmod 600 encryption.key security.properties server.xml setenv-core solution-users.properties vcac.keystore vcac.properties
chown root:root /etc/apache2/server.pem
chmod 400 /etc/apache2/server.pem
Next we need to edit the setenv-core file to increment the ID of this appliance:
vi /etc/vcac/setenv-core
Find the line VCAC_OPTS="$VCAC_OPTS -Dcluster.node.instance=cafe.node.1″ and enter a new ID – e.g. node.2, then save and quit (escape, :wq!)
Restart the vCAC services using:
service vcac-server restart
It can take quite a long time for all of the vCAC services to start (>15m) – you can watch it happening by tailing the catalina.out log file (this is also useful for troubleshooting):
tail –f /var/log/vcac/catalina.out
Finally, disable the unused services on the secondary appliance:
service vpostgres stop
chkconfig vpostgres off
service vco-server stop
chkconfig vco-server off
Testing the clustered vCAC Appliances#
Before we move on, it’s a good idea to test the clustering of the appliances to ensure we’re not building on shaky ground.
- Edit the settings for the primary vCAC appliance and disconnect the vNIC
- Log onto the load balanced URL (e.g. https://vcloud.definit.local/shell-ui-app)
- Log out of the load balanced URL
- Edit the settings for the primary vCAC appliance and re-connect the vNIC
- Edit the settings for the secondary vCAC appliance and disconnect the vNIC
- Log onto the load balanced URL (e.g. https://vcloud.definit.local/shell-ui-app)
- Log out of the load balanced URL
- Edit the settings for the secondary vCAC appliance and re-connect the vNIC
And that’s it for this post – we now have a load balanced CAFE layer, with both appliances pointing to the external vPostgres database – it’s worth noting that we could actually repeat this process with more vCAC Appliances to further increase resilience and performance.
Next up, it’s reinstalling the IaaS layer in a distributed model.