<img class=“alignright wp-image-5603 size-medium” src="/images/2015/02/cisco_SG300-20_1.png" alt=“Cisco SG300-20” width=“300” height=“180” of upgrading my lab switch, which is the excellent Cisco SG300-20, I’ve not had a chance to update the firmware since it was released 6 months ago because of the downtime. For some reason I prefer configuring the SG300 from the command line - a hangover from my old networking days I suppose, but somehow it doesn’t feel right to me to use the GUI!
I found an article by Chris Wahl which ran through the steps required to do it via the GUI. If you’re only interested in doing the update, then I suggest following Chris’ article - otherwise follow me for some CLI goodness!
@sammcgeown and you're going to post the CLI version instructions, right? 😀
— Chris Wahl (@ChrisWahl) February 9, 2015
Download the latest firmware from Cisco (at present -
Note: You can’t go directly from version 1.1.2 to 1.4.0.88 - you have to use 1.3.7.18 as an intermediate update
You need a TFTP server set up - I like Open TFTP Server but there are plenty of other free ones around - just unzip the firmware package from Cisco and place the two files (.ros and .rfb) in the TFTP root. It’s worth noting that the rfb file is a boot image, and the ros file is the firmware image.
It’s a pretty good idea at this point to back up your switch configuration and current firmware/boot image. Also, your switch will reboot a couple of times during the process so make sure nothing important is happening on the network - I shut down my whole lab environment.
Open a PuTTY session to your SG300 and use the below command to update the boot image first:
copy tftp://<tftp server/path/to/bootimage.rfb boot

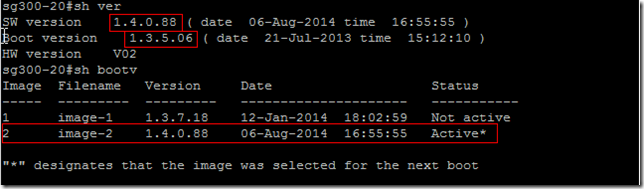
Use “sh ver” to check that the Boot version is now correct:

Note: You can’t go directly from version 1.1.2 to 1.4.0.88 - you have to use 1.3.7.18 as an intermediate update
Use “wr” to ensure you current running-config is saved to startup-config and then “reload” to reboot the switch.
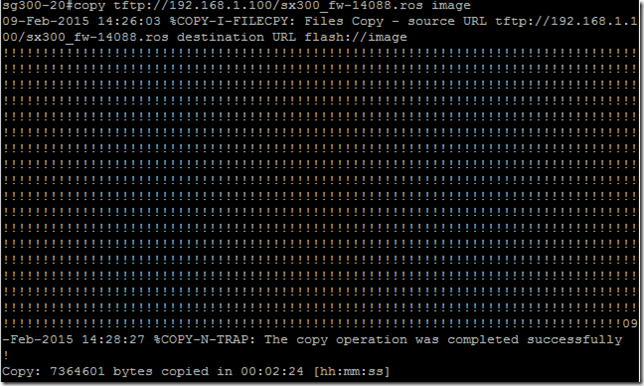
Once the switch has rebooted, SSH back in and upload the firmware package:
copy tftp://<tftp server/path/to/firmware.ros image
Now the image has been copied to flash but is not yet active, use “sh bootv” to list the versions available:

Check which filename is the new version and “not active” and then use the following command to activate it next boot:
boot system image-2
Once again, “wr” and “reload”. When the switch comes back up you can check it’s using the new firmware: