
With the release of vSphere 6.5, VMware upped the game for vCenter High Availability (vCHA) and introduced an active/passive/witness cluster setup to provide a failover cluster for vCenter Server Appliances. The diagram below shows the architecture of the solution.

Deploying vCHA can be done in two modes - “Basic” and “Advanced”. You can use Basic mode if the vCenter you want to be HA is managing the hosts it resides on - in this scenario the wizard configures your vCenter and deploys the Passive and Witness nodes for you. If you have a management cluster for your vCenter Server, or you are deploying a nested environment, you need to use the advanced mode - in this scenario you must configure your active node, deploy clones for the passive and witness nodes, then enable the configuration.
The ever-there-first William Lam has written an excellent PowerShell module for vCHA in Basic mode, which gave me a massive head start when looking at the code for Advanced mode. I will hopefully contributing part of my code to this module to extend it.
For those who just want the script, check out my GitHub repository - HA vCenter DeployThe process to configure vCHA manually, and in my script goes like this:
- Deploy the Active vCenter Server Appliance
- Assign a license to vCenter (required to enable HA)
- Add a 2nd NIC for the Private heartbeat network
- Prepare VCSA for HA
- Clone the Passive node
- Clone the Witness node
- Configure VCSA for HA
- Resize the Witness node
- Create a DRS rule separating all the nodes
All in, it takes about 50 minutes to deploy and configure (on my lab hardware, YMMV). I’ve broken each step up so it can be ran separately (using the switches) or all at once (no switches). Configuration is in the form of a JSON file which is loaded into the $podConfig variable. A verbose log file contains all the output that is supressed in the console when running, for debugging - again the file is defined in the JSON config.
JSON Config File#
The configuration file should be (hopefully) fairly self explanatory, with the following sections:
target - the destination vCenter instance, including credentials, locations, network port groups and network details
sources - the path to the folder containing the extracted VCSA installers
active - configuration for the Active VCSA server
cluster - configuration for the cluster members
general - miscellaneous configuration such as syslog server, log location and SSH enable
license - the required licenses (just vSphere in this case!)
{ “__version”: “0.1”, “__comments”: “Configuration for ha-vcenter-deploy.ps1 - www.definit.co.uk”, “target”: { “server”: “vcsa.definit.local”, “user”: “[email protected]”, “password”: “VMware1!”, “datacenter”: “Lab”, “cluster”: “Workload”, “datastore”: “vsanDatastore”, “folder”: “Nested Labs/HA-vCenter”, “portgroup”: “HA-vCenter-Management”, “ha-portgroup”: “HA-vCenter-Heartbeat”, “network”: { “netmask”: “255.255.255.0”, “gateway”: “10.0.11.1”, “prefix”: “24”, “dns”: “192.168.1.20”, “domain”: “definit.local”, “ntp”: “192.168.1.1” } }, “sources”: { “VCSAInstaller”: “e:\Pod-Deploy\vSphere\VMware-VCSA-all-6.5.0-4944578” }, “active”: { “deploymentSize”: “small”, “name”: “ha-vc-active”, “ip”: “10.0.11.10”, “ha-ip”: “172.16.1.1”, “hostname”: “ha-vc.definit.local”, “rootPassword”: “VMware1!”, “sso”: { “domain”: “vsphere.local”, “site”: “Default-First-Site”, “password”: “VMware1!” }, “datacenter”: “HA-vCenter-Datacenter”, “cluster”: “HA-vCenter-Cluster-1”, “distributedSwitch”: “HA-vCenter-VDS”, “portgroup”: “HA-vCenter-PortGroup” }, “cluster”: { “passive-ip”: “172.16.1.2”, “passive-name”: “ha-vc-passive”, “witness-ip”: “172.16.1.3”, “witness-name”: “ha-vc-witness”, “ha-mask”: “255.255.255.248” }, “general”: { “syslog”: “192.168.1.26”, “ssh”: true, “log”: “ha-vcenter-deploy.log” }, “license”: { “vcenter”: “7H23H-11111-22222-33333-90ZQN” } }
Deploy the Active vCenter Server Appliance#
Deploying a VCSA
.\ha-vcenter-deploy.ps1 -configFile .\ha-vcenter-deploy.json -deployActive

Assign a license to vCenter (required to enable HA)#
.\ha-vcenter-deploy.ps1 -configFile .\ha-vcenter-deploy.json -licenseVCSA

Add a 2nd NIC for the Private heartbeat network#
.\ha-vcenter-deploy.ps1 -configFile .\ha-vcenter-deploy.json -addSecondaryNic

Prepare VCSA for HA#
.\ha-vcenter-deploy.ps1 -configFile .\ha-vcenter-deploy.json -licenseVCSA

Clone the Passive node#
.\ha-vcenter-deploy.ps1 -configFile .\ha-vcenter-deploy.json -clonePassiveVM

Clone the Witness node#
.\ha-vcenter-deploy.ps1 -configFile .\ha-vcenter-deploy.json -cloneWitnessVM

Configure VCSA for HA#
.\ha-vcenter-deploy.ps1 -configFile .\ha-vcenter-deploy.json -configureVCHA

Resize the Witness node#
.\ha-vcenter-deploy.ps1 -configFile .\ha-vcenter-deploy.json -resizeWitness

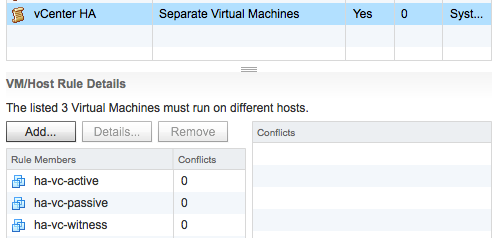
Create a DRS rule separating all the nodes#
.\ha-vcenter-deploy.ps1 -configFile .\ha-vcenter-deploy.json -createDRSRule

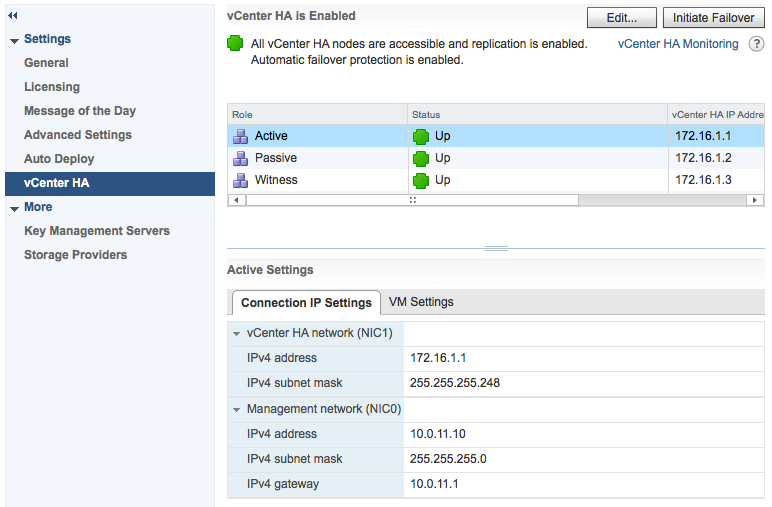
Validating the deployment#
Validating the deployment is as simple as logging onto the new highly available vCenter and checking the Configuration > vCenter HA tab - as you can see below, the Active, Passive and Witness are all up.
The PowerShell script and a template JSON file are available on my GitHub repository - HA vCenter Deploy
Some further reading and resources I used:
- https://featurewalkthrough.vmware.com/#!/vsphere-6-5/enabling-vcenter-ha-advanced/1
- http://www.virtuallyghetto.com/2016/11/vghetto-automated-vsphere-lab-deployment-for-vsphere-6-0u2-vsphere-6-5.html
- http://www.virtuallyghetto.com/2016/12/vcenter-server-high-availability-vcha-powercli-6-5-community-module.html
- http://www.virtuallyghetto.com/2017/01/exploring-new-vcsa-vami-api-wpowercli-part-1.html