vRealize Automation 7.3 Distributed Install – Prerequisites
 Sam McGeown
As a consultant I’ve had the opportunity to design, install and configure dozens of production vRealize Automation deployments, from reasonably small Proof of Concept environments to globally-scaled multi-datacenter fully distributed behemoths. It’s fair to say, that I’ve made mistakes along the way - and learned a lot of lessons as to what makes a deployment a success.
In the end, pretty much everything comes down to getting the pre-requisites right. Nothing that I’ve written here is not already documented in the official documentation, and the installation wizard does a huge amount of the work for you.
For the purposes of this post, I am working with the following components, which have been pre-deployed on a single flat network.
vRA Appliances
Server |
vra-app-1 |
vra-app-2 |
Server |
vra-web-1 |
vra-web-2 |
vra-man-1 |
vra-man-2 |
vra-dem-1 |
vra-dem-2 |
vra-sql |
DNS Records
A and PTR (forward and reverse) DNS records are required for all components deployed - appliances and IAAS servers. DNS is a critical component of the application, you must be able to resolve the FQDN and the short name of all components, as well as reverse lookups. Use nslookup to validate from each server, to all other servers.
In addition to FQDNs configured for all the components, an A record will be required for each of the load balanced URLs.
The FQDNs need to be included in the Subject Alternative Names in the SSL certificates.
vra-app-1.definit.local -> vRA Appliance 1
vra-app-2.definit.local -> vRA Appliance 2
vra-web-1.definit.local -> vRA Web Server 1
vra-web-2.definit.local -> vRA Web Server 2
vra-man-1.definit.local -> vRA Manager Server 1
vra-man-2.definit.local -> vRA Manager Server 2
vra-dem-1.definit.local -> vRA DEM and vSphere Agent 1
vra-dem-2.definit.local -> vRA DEM and vSphere Agent 2
vra-sql-1.definit.local -> MSSQL Server (or cluster VIP)
vra-app.definit.local* -> Cafe Load Balancer IP
vra-web.definit.local* -> Web Load Balancer IP
vra-man.definit.local* -> Manager Load Balancer IP
I typically create a CNAME for the load balancer VIPs first, then move to A records later - see the Load Balancer section below.
NTP
It’s important to use a common time source for all components - domain joined Windows VMs for IaaS will use use the Domain Controllers. My DCs use my local NTP server, so the vRA Appliances are synchronised with the local NTP server directly too. You can use VMware Tools to set the time on each VM - if you do this ensure that the ESXi hosts have a common time source. Use one method or the other, but not a mix!
NTP for the vRA Appliance is configured when you run the installation wizard, and can be configured via the VAMI interface.
IaaS Windows Servers
Since it’s introduction in vRA 7, the installation wizard does a fantastic job configuring the IaaS Windows Servers for their roles, and this massively improves the chance of a successful deployment first time. There are a few things that I always do for each Windows Server.
Patching
Update the IaaS servers with the latest patches before doing anything - typically this means maintaining an up-to-date template and deploying from that, whatever the method, ensure that the server is patched and that no updates will interfere with the deployment.
Reinstall MSDTC
One common problem is that cloned VMs don’t generate a unique ID for MSDTC. This causes communication issues when you’re deploying vRA. You can either remove MSDTC from your template, then install once you’ve deployed it, or reinstall on the cloned VM. This issue does not affect Windows servers deployed by other methods than cloning.
[code]msdtc -uninstall && msdtc -install[/code]
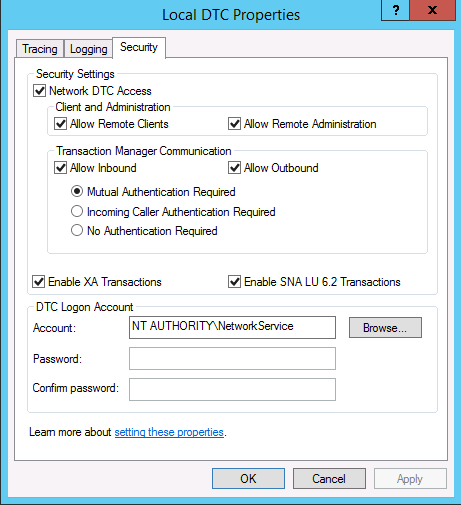
Configure MSDTC
MSDTC should be configured on all the IaaS boxes to allow communication with the MSSQL Server. You can use the following PowerShell command, or manually set it from Component Services.
[code]Set-DtcNetworkSetting -DtcName “Local” -RemoteAdministrationAccessEnabled:$True -RemoteClientAccessEnabled:$True -InboundTransactionsEnabled:$True -OutboundTransactionsEnabled:$True -LUTransactionsEnabled:$True -Confirm:$False[/code]
Service Account
Create a service account to run the IaaS components. From the VMware documentation, it must meet the following requirements:
The account must be a domain user.
The account does not need to be a domain administrator, but must have local administrator permission, before installation, on all IaaS Windows servers.
The account password cannot contain a double quotation mark ( " ) character.
The Management Agent installer for IaaS Windows servers prompts you for the account credentials.
The account must have Log on as a service permission, which lets the Manager Service start and generate log files.
The account must have dbo permission on the IaaS database. If you use the installer to create the database, add the account login to SQL Server before installation. The installer grants the dbo permission after it creates the database.
If you use the installer to create the database, in SQL, add the sysadmin role to the account before installation. The sysadmin role is not required if you choose to use a pre-existing empty database.
In my lab environment, I’ve used [email protected]
To quickly add the service account to all Windows servers, you can run the following command:
[code]net localgroup administrators [email protected] /add[/code]
Firewall
Typically I disable the Windows Firewall on all IaaS components during installation using the following command - it’s too easy to miss a required rule and break the installation:
[code]netsh advfirewall set allprofiles state off[/code]
Once the deployment is complete create rules for the well defined communications, based on IaaS Windows Server Ports documentation
MSSQL
A supported version of Microsft SQL server should be installed and configured for TCP/IP communication. As specified above, the IaaS service account should have dbo permission on the IaaS database, and if you want to create the database from the installer then you also need sysadmin role, which can be revoked after installation.
Certificates
Certificates need to be generated for the vRA appliances, the Web service and the Manager service. There are a couple of ways to do this that will work, some are more manual than others. The method I use is to generate a Certificate Signing Request (CSR) and Private Key using OpenSSL, then sign them using my Microsoft Certificate Services Certificate Authority. Any standards compliant Certificate Authority, public or private, should be able to sign your certificates.
Getting the certificates minted up front and correctly is
The following configuration template can be used to generate the CSRs for each component, make sure to change the subjectAltName values to match the components you’re issuing for. The commonName can actually be anything you like, since it’s not used for the SSL, but I prefer to keep the load balanced name.
[code]
[ req ]
default_bits = 2048
default_keyfile = rui.key
distinguished_name = req_distinguished_name
encrypt_key = no
prompt = no
string_mask = nombstr
req_extensions = v3_req
[ v3_req ]
basicConstraints = CA:FALSE
keyUsage = digitalSignature, keyEncipherment, dataEncipherment, nonRepudiation
extendedKeyUsage = serverAuth, clientAuth
subjectAltName = DNS:vra-app.definit.local,DNS:vra-app-1.definit.local,DNS:vra-app-2.definit.local
[ req_distinguished_name ]
countryName = GB
stateOrProvinceName = West Sussex
localityName = Horsham
0.organizationName = DefinIT
organizationalUnitName = Lab
commonName = vra-app.definit.local
[/code]
- Create a config file using the above template
- Use openssl and the config file to create a Private Key and a Certificate Signing Request (CSR)
- openssl req -new -nodes -out vra-web.csr -keyout vra-web.key -config vra-web.cfg
- Submit the CSR to your Certificate Authority (public, or private)
- Download the certificate response
- Download the Certificate Authority root and intermediate certificates
When I’ve generated certificates and requests, I will have the following files:
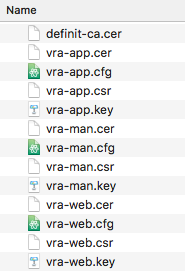
During the install wizard you need the .key (private key), .cer (certificate) and CA certificate files.
Load Balancers
During the installation phase of a distributed vRA deployment I always very strongly suggest using a CNAME pointed to the primary nodes for the Cafe, Web and Manager components. This is because the configuration of the load balancer is so critical to success that any misconfiguration can cause errors and a failed deployment. If you use a CNAME you can guarantee the deployment succeeds first time, and introduce the load balancer later.
When it comes to configuring the load balancer, Jad El Zein has a great resource in his Distributed Install Guide
The Install Wizard
Once the pre-requisites are in place, running the install wizard should be straightforward - I have run through the wizard below to prove that it can be done right, first time! I hope this post will save you some time and effort, and maybe help to not trip over the same mistakes I made!
  <div class="hybgl-prl1-double-bounce2">
  </div>
</div>
      <div class="hybgl-item-meta">
        <div class="hybgl-item-meta-descr">
          Click Next
        </div>
      </div>
    </div>

    <div class="hybgl-item hybgl-main-item" data-w="1024" data-h="833">
      <div class="hybgl-item-inner" style="background-image:url(/images/2017/07/2017-07-13_11-51-09.png);">
      </div>

      <div class="hybgl-item-meta">
        <div class="hybgl-item-meta-descr">
          Tick the acceptance and click Next
        </div>
      </div>
    </div>

    <div class="hybgl-item hybgl-main-item" data-w="1023" data-h="830">
      <div class="hybgl-item-inner" style="background-image:url(/images/2017/07/2017-07-13_11-51-35.png);">
      </div>

      <div class="hybgl-item-meta">
        <div class="hybgl-item-meta-descr">
          Select Enterprise deployment, and ensure the Install Infrastructure as a Service box it checked. Click next
        </div>
      </div>
    </div>

    <div class="hybgl-item hybgl-main-item" data-w="1023" data-h="833">
      <div class="hybgl-item-inner" style="background-image:url(/images/2017/07/2017-07-19_19-26-04.png);">
      </div>

      <div class="hybgl-item-meta">
        <div class="hybgl-item-meta-descr">
          If you've used the load balancer during installation you can now enable the secondary nodes and health checks. If using CNAMEs then point them to the load balancer VIPs. Click Finish
        </div>
      </div>
    </div>

    <div class="hybgl-item hybgl-main-item" data-w="1023" data-h="830">
      <div class="hybgl-item-inner" style="background-image:url(/images/2017/07/2017-07-19_19-24-58.png);">
      </div>

      <div class="hybgl-item-meta">
        <div class="hybgl-item-meta-descr">
          Select to run the inital setup workflow, migrate from another vRA instance or continue to set up manually. Click Next
        </div>
      </div>
    </div>

    <div class="hybgl-item hybgl-main-item" data-w="1023" data-h="832">
      <div class="hybgl-item-inner" style="background-image:url(/images/2017/07/2017-07-19_19-24-31.png);">
      </div>

      <div class="hybgl-item-meta">
        <div class="hybgl-item-meta-descr">
          Chose to join the VMware CEIP or not, and click Next
        </div>
      </div>
    </div>

    <div class="hybgl-item hybgl-main-item" data-w="1023" data-h="832">
      <div class="hybgl-item-inner" style="background-image:url(/images/2017/07/2017-07-19_19-23-56.png);">
      </div>

      <div class="hybgl-item-meta">
        <div class="hybgl-item-meta-descr">
          Enter the license key and click Submit Key. Click Next
        </div>
      </div>
    </div>

    <div class="hybgl-item hybgl-main-item" data-w="1021" data-h="829">
      <div class="hybgl-item-inner" style="background-image:url(/images/2017/07/2017-07-19_19-19-18.png);">
      </div>

      <div class="hybgl-item-meta">
        <div class="hybgl-item-meta-descr">
          Click Install to begin the installation. Once the installation is completed, click Next.
        </div>
      </div>
    </div>

    <div class="hybgl-item hybgl-main-item" data-w="1025" data-h="831">
      <div class="hybgl-item-inner" style="background-image:url(/images/2017/07/2017-07-19_11-21-36.png);">
      </div>

      <div class="hybgl-item-meta">
        <div class="hybgl-item-meta-descr">
          Create snapshots of all components. Click next
        </div>
      </div>
    </div>

    <div class="hybgl-item hybgl-main-item" data-w="1025" data-h="833">
      <div class="hybgl-item-inner" style="background-image:url(/images/2017/07/2017-07-19_11-21-10.png);">
      </div>

      <div class="hybgl-item-meta">
        <div class="hybgl-item-meta-descr">
          Click Validate and ensure all the configuration passes. If validation fails, fix the issue and re-validate. Click Next
        </div>
      </div>
    </div>

    <div class="hybgl-item hybgl-main-item" data-w="1022" data-h="832">
      <div class="hybgl-item-inner" style="background-image:url(/images/2017/07/2017-07-19_11-16-54.png);">
      </div>

      <div class="hybgl-item-meta">
        <div class="hybgl-item-meta-descr">
          Review the load balancer configuration to ensure only the primary nodes are active and health checks are disabled. If you use CNAMES you don't need to do anything here. Click Next
        </div>
      </div>
    </div>

    <div class="hybgl-item hybgl-main-item" data-w="1024" data-h="832">
      <div class="hybgl-item-inner" style="background-image:url(/images/2017/07/2017-07-19_10-41-17.png);">
      </div>

      <div class="hybgl-item-meta">
        <div class="hybgl-item-meta-descr">
          Use the same process to import the Manager Service Certificate. Click Save Imported Certificate and click Next
        </div>
      </div>
    </div>

    <div class="hybgl-item hybgl-main-item" data-w="1023" data-h="834">
      <div class="hybgl-item-inner" style="background-image:url(/images/2017/07/2017-07-19_10-32-29.png);">
      </div>

      <div class="hybgl-item-meta">
        <div class="hybgl-item-meta-descr">
          Use the same process to import the Web Certificate. Click Save Imported Certificate and click Next
        </div>
      </div>
    </div>

    <div class="hybgl-item hybgl-main-item" data-w="1024" data-h="832">
      <div class="hybgl-item-inner" style="background-image:url(/images/2017/07/2017-07-13_17-03-28.png);">
      </div>

      <div class="hybgl-item-meta">
        <div class="hybgl-item-meta-descr">
          Select Import and paste the contents of the private key file (vra-web.key) into the RSA Private Key. Copy the contents of the certificate (vra-web.cer) then the CA certificate (definit-ca.cer) into the Certificate Chain field. If you have an intermedia CA, copy the certificates in order. Click Save Imported Certificate. Click Next
        </div>
      </div>
    </div>

    <div class="hybgl-item hybgl-main-item" data-w="1024" data-h="832">
      <div class="hybgl-item-inner" style="background-image:url(/images/2017/07/2017-07-13_16-37-38.png);">
      </div>

      <div class="hybgl-item-meta">
        <div class="hybgl-item-meta-descr">
          Configure the vSphere Agents as identical copies, this provides the HA for the Agent. Select the Agent Type, enter the Agent Name, Endpoint and service account. Click Next
        </div>
      </div>
    </div>

    <div class="hybgl-item hybgl-main-item" data-w="1024" data-h="831">
      <div class="hybgl-item-inner" style="background-image:url(/images/2017/07/2017-07-13_15-44-21.png);">
      </div>

      <div class="hybgl-item-meta">
        <div class="hybgl-item-meta-descr">
          Configure the active Manager Service, and the service account. Click next
        </div>
      </div>
    </div>

    <div class="hybgl-item hybgl-main-item" data-w="1024" data-h="831">
      <div class="hybgl-item-inner" style="background-image:url(/images/2017/07/2017-07-13_15-06-02.png);">
      </div>

      <div class="hybgl-item-meta">
        <div class="hybgl-item-meta-descr">
          Configure the Distributed Execution Manager instance names and service accounts. Click Next
        </div>
      </div>
    </div>

    <div class="hybgl-item hybgl-main-item" data-w="1022" data-h="831">
      <div class="hybgl-item-inner" style="background-image:url(/images/2017/07/2017-07-13_14-20-00.png);">
      </div>

      <div class="hybgl-item-meta">
        <div class="hybgl-item-meta-descr">
          Configure the IaaS Website name, and service account credentials. Click Next
        </div>
      </div>
    </div>

    <div class="hybgl-item hybgl-main-item" data-w="1024" data-h="831">
      <div class="hybgl-item-inner" style="background-image:url(/images/2017/07/2017-07-13_14-18-54.png);">
      </div>

      <div class="hybgl-item-meta">
        <div class="hybgl-item-meta-descr">
          Configure the SQL Server name, database name and options. Click Next
        </div>
      </div>
    </div>

    <div class="hybgl-item hybgl-main-item" data-w="1024" data-h="833">
      <div class="hybgl-item-inner" style="background-image:url(/images/2017/07/2017-07-13_14-17-25.png);">
      </div>

      <div class="hybgl-item-meta">
        <div class="hybgl-item-meta-descr">
          Configure the load balancer URL for the IaaS Web and Manager Service. Configure the database encryption passphrase. Click Next
        </div>
      </div>
    </div>

    <div class="hybgl-item hybgl-main-item" data-w="1024" data-h="834">
      <div class="hybgl-item-inner" style="background-image:url(/images/2017/07/2017-07-13_14-16-38.png);">
      </div>

      <div class="hybgl-item-meta">
        <div class="hybgl-item-meta-descr">
          Configure the password for [email protected]. Click Next
        </div>
      </div>
    </div>

    <div class="hybgl-item hybgl-main-item" data-w="1025" data-h="831">
      <div class="hybgl-item-inner" style="background-image:url(/images/2017/07/2017-07-13_14-15-18.png);">
      </div>

      <div class="hybgl-item-meta">
        <div class="hybgl-item-meta-descr">
          Enter the load balancer name for the appliances. Click Next
        </div>
      </div>
    </div>

    <div class="hybgl-item hybgl-main-item" data-w="1024" data-h="833">
      <div class="hybgl-item-inner" style="background-image:url(/images/2017/07/2017-07-13_13-39-20.png);">
      </div>

      <div class="hybgl-item-meta">
        <div class="hybgl-item-meta-descr">
          Once the prerequisite check passes, click Next to continue
        </div>
      </div>
    </div>

    <div class="hybgl-item hybgl-main-item" data-w="1025" data-h="831">
      <div class="hybgl-item-inner" style="background-image:url(/images/2017/07/2017-07-13_12-10-28.png);">
      </div>

      <div class="hybgl-item-meta">
        <div class="hybgl-item-meta-descr">
          Click Run to run the prequisite checker. Click Fix to configure any missing prerequisites
        </div>
      </div>
    </div>

    <div class="hybgl-item hybgl-main-item" data-w="1024" data-h="832">
      <div class="hybgl-item-inner" style="background-image:url(/images/2017/07/2017-07-13_12-06-45.png);">
      </div>

      <div class="hybgl-item-meta">
        <div class="hybgl-item-meta-descr">
          Assign the roles to the correct IaaS servers
        </div>
      </div>
    </div>

    <div class="hybgl-item hybgl-main-item" data-w="1024" data-h="831">
      <div class="hybgl-item-inner" style="background-image:url(/images/2017/07/2017-07-13_12-06-08.png);">
      </div>

      <div class="hybgl-item-meta">
        <div class="hybgl-item-meta-descr">
          Add the second vRA Appliance details only
        </div>
      </div>
    </div>

    <div class="hybgl-item hybgl-main-item" data-w="1024" data-h="832">
      <div class="hybgl-item-inner" style="background-image:url(/images/2017/07/2017-07-13_12-04-29.png);">
      </div>

      <div class="hybgl-item-meta">
        <div class="hybgl-item-meta-descr">
          Back in the wizard all of the vRA IaaS servers should now be reporting in. Check the time offset and correct any that are too far adrift
        </div>
      </div>
    </div>

    <div class="hybgl-item hybgl-main-item" data-w="507" data-h="396">
      <div class="hybgl-item-inner" style="background-image:url(/images/2017/07/2017-07-13_11-55-00.png);">
      </div>

      <div class="hybgl-item-meta">
        <div class="hybgl-item-meta-descr">
          Click Install to complete the installation
        </div>
      </div>
    </div>

    <div class="hybgl-item hybgl-main-item" data-w="508" data-h="397">
      <div class="hybgl-item-inner" style="background-image:url(/images/2017/07/2017-07-13_11-54-48.png);">
      </div>

      <div class="hybgl-item-meta">
        <div class="hybgl-item-meta-descr">
          Configure the service account credentials and click Next
        </div>
      </div>
    </div>

    <div class="hybgl-item hybgl-main-item" data-w="507" data-h="397">
      <div class="hybgl-item-inner" style="background-image:url(/images/2017/07/2017-07-13_11-54-28.png);">
      </div>

      <div class="hybgl-item-meta">
        <div class="hybgl-item-meta-descr">
          Configure the details of the primary vRA Appliance. Enter the root credentials and click Load to get the SSL certificate fingerprint. Confirm the fingerprint matches, and click Next
        </div>
      </div>
    </div>

    <div class="hybgl-item hybgl-main-item" data-w="507" data-h="396">
      <div class="hybgl-item-inner" style="background-image:url(/images/2017/07/2017-07-13_11-53-55.png);">
      </div>

      <div class="hybgl-item-meta">
        <div class="hybgl-item-meta-descr">
          Chose the install location and click Next
        </div>
      </div>
    </div>

    <div class="hybgl-item hybgl-main-item" data-w="508" data-h="397">
      <div class="hybgl-item-inner" style="background-image:url(/images/2017/07/2017-07-13_11-53-42.png);">
      </div>

      <div class="hybgl-item-meta">
        <div class="hybgl-item-meta-descr">
          Accept the License Agreement and click Next
        </div>
      </div>
    </div>

    <div class="hybgl-item hybgl-main-item" data-w="508" data-h="398">
      <div class="hybgl-item-inner" style="background-image:url(/images/2017/07/2017-07-13_11-53-31.png);">
      </div>

      <div class="hybgl-item-meta">
        <div class="hybgl-item-meta-descr">
          Download the Management Agent installer and run through the installation on each IaaS server. Click Next
        </div>
      </div>
    </div>

    <div class="hybgl-item hybgl-main-item" data-w="1024" data-h="830">
      <div class="hybgl-item-inner" style="background-image:url(/images/2017/07/2017-07-13_11-52-40.png);">
      </div>

      <div class="hybgl-item-meta">
        <div class="hybgl-item-meta-descr">
          Right click the IaaS Management Agent download link and copy the link location.
        </div>
      </div>
    </div>

    <div class="hybgl-item hybgl-main-item" data-w="1023" data-h="831">
      <div class="hybgl-item-inner" style="background-image:url(/images/2017/07/2017-07-13_11-52-20.png);">
      </div>

      <div class="hybgl-item-meta">
        <div class="hybgl-item-meta-descr">
          Configure NTP or Host Time sync, then click Change Time Settings
        </div>
      </div>
    </div>
  </div>

  <div class="hybgl-navigation">
    <span class="hybgl-arrows-left"><i class="fa fa-chevron-left"></i></span><span class="hybgl-arrows-right"><i class="fa fa-chevron-right"></i></span>
  </div>
</div>

<div class="hybgl-child-container">
  <div class="hybgl-child-container-inner">
    <div class="hybgl-item hybgl-child-item" data-w="1024" data-h="830">
      <div class="hybgl-item-inner" style="background-image:url(/images/2017/07/2017-07-13_11-50-54.png);">
      </div>
    </div>

    <div class="hybgl-item hybgl-child-item" data-w="1024" data-h="833">
      <div class="hybgl-item-inner" style="background-image:url(/images/2017/07/2017-07-13_11-51-09.png);">
      </div>
    </div>

    <div class="hybgl-item hybgl-child-item" data-w="1023" data-h="830">
      <div class="hybgl-item-inner" style="background-image:url(/images/2017/07/2017-07-13_11-51-35.png);">
      </div>
    </div>

    <div class="hybgl-item hybgl-child-item" data-w="1023" data-h="833">
      <div class="hybgl-item-inner" style="background-image:url(/images/2017/07/2017-07-19_19-26-04.png);">
      </div>
    </div>

    <div class="hybgl-item hybgl-child-item" data-w="1023" data-h="830">
      <div class="hybgl-item-inner" style="background-image:url(/images/2017/07/2017-07-19_19-24-58.png);">
      </div>
    </div>

    <div class="hybgl-item hybgl-child-item" data-w="1023" data-h="832">
      <div class="hybgl-item-inner" style="background-image:url(/images/2017/07/2017-07-19_19-24-31.png);">
      </div>
    </div>

    <div class="hybgl-item hybgl-child-item" data-w="1023" data-h="832">
      <div class="hybgl-item-inner" style="background-image:url(/images/2017/07/2017-07-19_19-23-56.png);">
      </div>
    </div>

    <div class="hybgl-item hybgl-child-item" data-w="1021" data-h="829">
      <div class="hybgl-item-inner" style="background-image:url(/images/2017/07/2017-07-19_19-19-18.png);">
      </div>
    </div>

    <div class="hybgl-item hybgl-child-item" data-w="1025" data-h="831">
      <div class="hybgl-item-inner" style="background-image:url(/images/2017/07/2017-07-19_11-21-36.png);">
      </div>
    </div>

    <div class="hybgl-item hybgl-child-item" data-w="1025" data-h="833">
      <div class="hybgl-item-inner" style="background-image:url(/images/2017/07/2017-07-19_11-21-10.png);">
      </div>
    </div>

    <div class="hybgl-item hybgl-child-item" data-w="1022" data-h="832">
      <div class="hybgl-item-inner" style="background-image:url(/images/2017/07/2017-07-19_11-16-54.png);">
      </div>
    </div>

    <div class="hybgl-item hybgl-child-item" data-w="1024" data-h="832">
      <div class="hybgl-item-inner" style="background-image:url(/images/2017/07/2017-07-19_10-41-17.png);">
      </div>
    </div>

    <div class="hybgl-item hybgl-child-item" data-w="1023" data-h="834">
      <div class="hybgl-item-inner" style="background-image:url(/images/2017/07/2017-07-19_10-32-29.png);">
      </div>
    </div>

    <div class="hybgl-item hybgl-child-item" data-w="1024" data-h="832">
      <div class="hybgl-item-inner" style="background-image:url(/images/2017/07/2017-07-13_17-03-28.png);">
      </div>
    </div>

    <div class="hybgl-item hybgl-child-item" data-w="1024" data-h="832">
      <div class="hybgl-item-inner" style="background-image:url(/images/2017/07/2017-07-13_16-37-38.png);">
      </div>
    </div>

    <div class="hybgl-item hybgl-child-item" data-w="1024" data-h="831">
      <div class="hybgl-item-inner" style="background-image:url(/images/2017/07/2017-07-13_15-44-21.png);">
      </div>
    </div>

    <div class="hybgl-item hybgl-child-item" data-w="1024" data-h="831">
      <div class="hybgl-item-inner" style="background-image:url(/images/2017/07/2017-07-13_15-06-02.png);">
      </div>
    </div>

    <div class="hybgl-item hybgl-child-item" data-w="1022" data-h="831">
      <div class="hybgl-item-inner" style="background-image:url(/images/2017/07/2017-07-13_14-20-00.png);">
      </div>
    </div>

    <div class="hybgl-item hybgl-child-item" data-w="1024" data-h="831">
      <div class="hybgl-item-inner" style="background-image:url(/images/2017/07/2017-07-13_14-18-54.png);">
      </div>
    </div>

    <div class="hybgl-item hybgl-child-item" data-w="1024" data-h="833">
      <div class="hybgl-item-inner" style="background-image:url(/images/2017/07/2017-07-13_14-17-25.png);">
      </div>
    </div>

    <div class="hybgl-item hybgl-child-item" data-w="1024" data-h="834">
      <div class="hybgl-item-inner" style="background-image:url(/images/2017/07/2017-07-13_14-16-38.png);">
      </div>
    </div>

    <div class="hybgl-item hybgl-child-item" data-w="1025" data-h="831">
      <div class="hybgl-item-inner" style="background-image:url(/images/2017/07/2017-07-13_14-15-18.png);">
      </div>
    </div>

    <div class="hybgl-item hybgl-child-item" data-w="1024" data-h="833">
      <div class="hybgl-item-inner" style="background-image:url(/images/2017/07/2017-07-13_13-39-20.png);">
      </div>
    </div>

    <div class="hybgl-item hybgl-child-item" data-w="1025" data-h="831">
      <div class="hybgl-item-inner" style="background-image:url(/images/2017/07/2017-07-13_12-10-28.png);">
      </div>
    </div>

    <div class="hybgl-item hybgl-child-item" data-w="1024" data-h="832">
      <div class="hybgl-item-inner" style="background-image:url(/images/2017/07/2017-07-13_12-06-45.png);">
      </div>
    </div>

    <div class="hybgl-item hybgl-child-item" data-w="1024" data-h="831">
      <div class="hybgl-item-inner" style="background-image:url(/images/2017/07/2017-07-13_12-06-08.png);">
      </div>
    </div>

    <div class="hybgl-item hybgl-child-item" data-w="1024" data-h="832">
      <div class="hybgl-item-inner" style="background-image:url(/images/2017/07/2017-07-13_12-04-29.png);">
      </div>
    </div>

    <div class="hybgl-item hybgl-child-item" data-w="507" data-h="396">
      <div class="hybgl-item-inner" style="background-image:url(/images/2017/07/2017-07-13_11-55-00.png);">
      </div>
    </div>

    <div class="hybgl-item hybgl-child-item" data-w="508" data-h="397">
      <div class="hybgl-item-inner" style="background-image:url(/images/2017/07/2017-07-13_11-54-48.png);">
      </div>
    </div>

    <div class="hybgl-item hybgl-child-item" data-w="507" data-h="397">
      <div class="hybgl-item-inner" style="background-image:url(/images/2017/07/2017-07-13_11-54-28.png);">
      </div>
    </div>

    <div class="hybgl-item hybgl-child-item" data-w="507" data-h="396">
      <div class="hybgl-item-inner" style="background-image:url(/images/2017/07/2017-07-13_11-53-55.png);">
      </div>
    </div>

    <div class="hybgl-item hybgl-child-item" data-w="508" data-h="397">
      <div class="hybgl-item-inner" style="background-image:url(/images/2017/07/2017-07-13_11-53-42.png);">
      </div>
    </div>

    <div class="hybgl-item hybgl-child-item" data-w="508" data-h="398">
      <div class="hybgl-item-inner" style="background-image:url(/images/2017/07/2017-07-13_11-53-31.png);">
      </div>
    </div>

    <div class="hybgl-item hybgl-child-item" data-w="1024" data-h="830">
      <div class="hybgl-item-inner" style="background-image:url(/images/2017/07/2017-07-13_11-52-40.png);">
      </div>
    </div>

    <div class="hybgl-item hybgl-child-item" data-w="1023" data-h="831">
      <div class="hybgl-item-inner" style="background-image:url(/images/2017/07/2017-07-13_11-52-20.png);">
      </div>
    </div>
  </div>
</div>
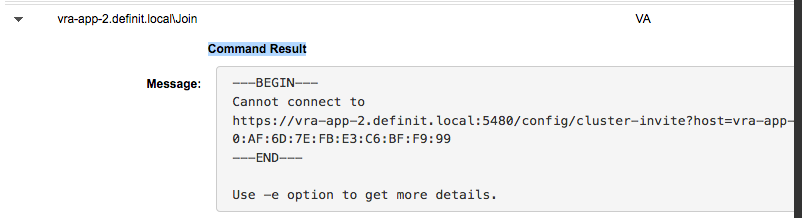
Full disclosure - I didn’t get a 100% success rate with this deployment, there was an error caused by CPU constraints in my lab that meant I had to hit “retry” on the step to join the 2nd vRA Appliance to the cluster. This wasn’t a failure of the pre-requisites, but a lack of CPU resource in my lab! ]3
]3