
Disclaimer! I am learning NSX-T, part of my learning is to deploy in my lab - if I contradict the official docs then go with the docs!
Lab Environment#
This NSX-T lab environment is built as a nested lab on my physical hosts. There are four physical ESXi hosts, onto which I will deploy three ESXi VMs, a vCenter Server Appliance, NSX Manager, an NSX Controller cluster, and two NSX Edge Nodes.

Physical, virtual and nested components of the NSX-T lab
Deployment Plan#
I will follow the deployment plan from the NSX-T 2.0 documentation:
- Install NSX Manager.
- Install NSX Controllers.
- Join NSX Controllers with the management plane.
- Initialize the control cluster to create a master controller.
- Join NSX Controllers into a control cluster.
- Join hypervisor hosts with the management plane.
- Install NSX Edges.
- Join NSX Edges with the management plane.
- Create transport zones and transport nodes.
When this post series is complete, the network topology should be something like this, with two hostswitches configured. The ESXi Hosts will have a Tunnel Endpoint IP address, as will the Edge. The Edge will also have an interface configured for a VLAN uplink.
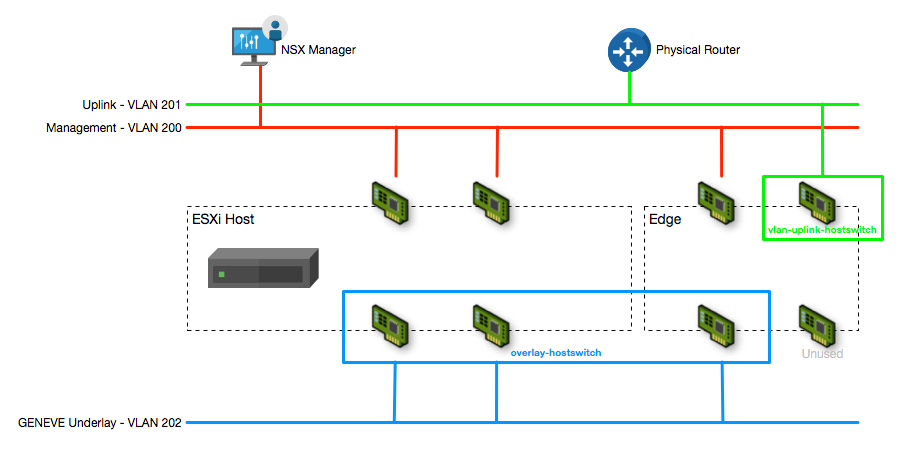
The NSX-T Transport Node network configuration
In this post I will walk through deploying the NSX Controllers and creating the NSX Controller Cluster.
Configuring the Controller Cluster#
Retrieve the NSX Manager API thumbprint#
- Log onto the NSX Manager via SSH using the admin credentials.
- Use “get certificate api thumbprint” to retrieve the SSL certificate thumbprint. Copy the output to use in commands later

Join the NSX Controllers to the NSX Manager#
- Log onto each of the NSX Controllers via SSH using the admin credentials.
- Use “join management-plane
username admin thumbprint "
- Enter the admin password when prompted
- Validate the controller has joined the Manager with “get managers” - you should see a status of “Connected”

- Repeat this procedure for all three controllers
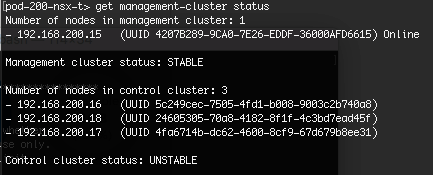
Validate the NSX Manager can see all three NSX Controllers, you can either open the NSX Manager web interface and check the System Dashboard, or use the “get management-cluster status” command on the NSX Manager.
Notice in the web interface you can see all three Controllers are present, and the Manager Connection status is “Up”, however the Cluster Status is “Down” on all three.

From the command line, you can see the same details reflected - all three Controllers are listed in the control cluster, but the custer status is “UNSTABLE”.
Initialise the Controller Cluster#
To configure the Controller cluster we need to log onto any of the Controllers and initialise the cluster. This can be any one of the Controllers, but it will make the controller the master node in the cluster. I opted to use pod-200-controller-1 for simplicity. Initialising the cluster requires a shared secret to be used on each node.
- Log onto the Controller node via SSH using the admin credentials.
- Use “set control-cluster security-model shared-secret” to configure the shared secret
- When the secret is configured, use “initialize control-cluster” to promote this node:

Validate the status of the node using the “get control-cluster status verbose” command. You can also check the status in the NSX Manager web interface. The command shows that the Controller is the master, in majority and can connect to the Zookeeper Server (a distributed configuration service)
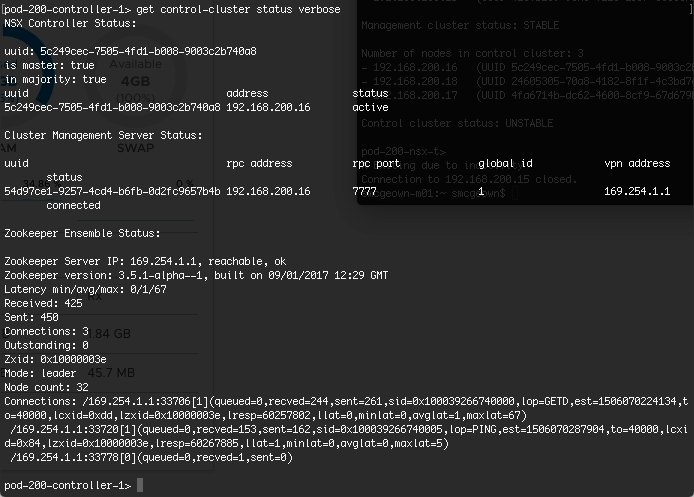
Notice in the web interface that the first node (pod-200-controller-1) has a Cluster Status of “Up”

Join the remaining Controller nodes to the Cluster#
Now that pod-200-controller-1 has been successfully initialised, we can join the additional nodes to the cluster. The following steps need to be done for each remaining Controller
- Log onto the Controller node via SSH using the admin credentials.
- Use “set control-cluster security-model shared-secret
” to configure the shared secret 
- Use “get control-cluster certificate thumbprint” to retrieve the node’s certificate thumbprint

- Log onto the master Controller node (pod-200-controller-1) via SSH using the admin credentials.
- Use “join control-cluster
thumbprint ” to join the additional Controller to the cluster
- Log onto the additional Controller nodes (pod-200-controller-2, pod-200-controller-3) via SSH using the admin credentials
- Use “activate control-cluster” to activate the node

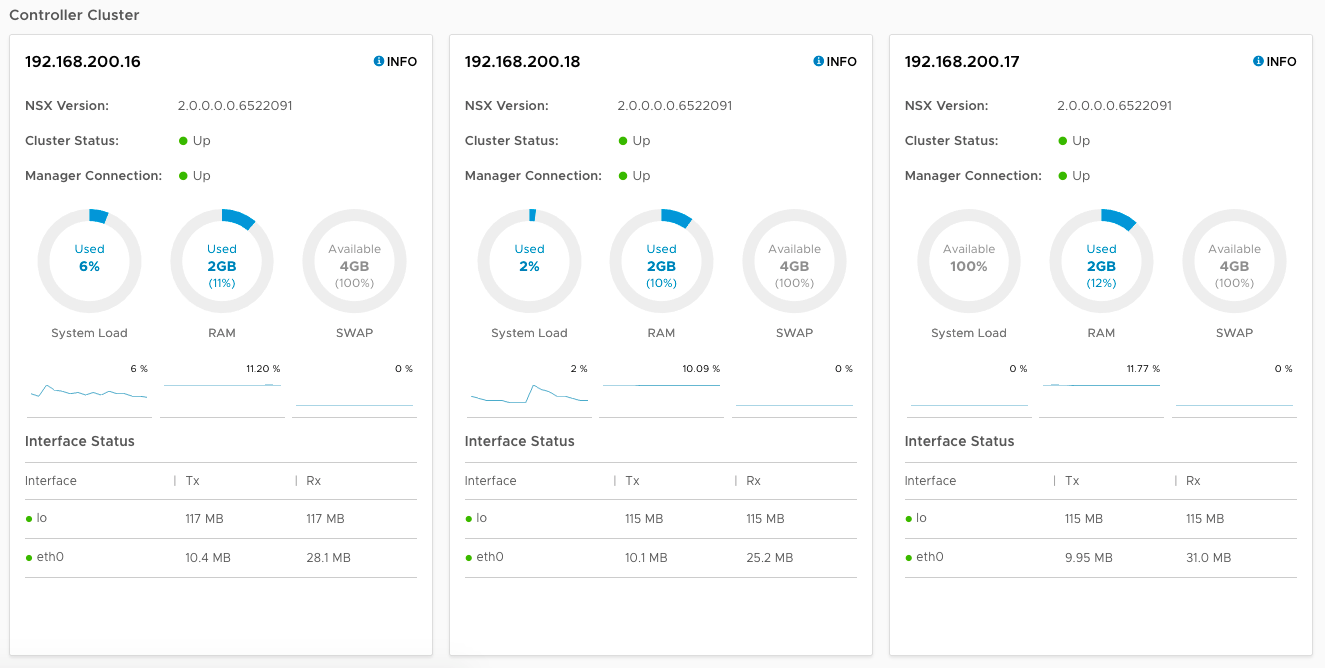
Validate the Controller nodes have joined the Control Cluster and are active using “get control-cluster status” on the master (pod-200-controller-1). You can also view the cluster status in the NSX Manager web interface.

Notice that all three nodes have a Cluster Status of “Up”
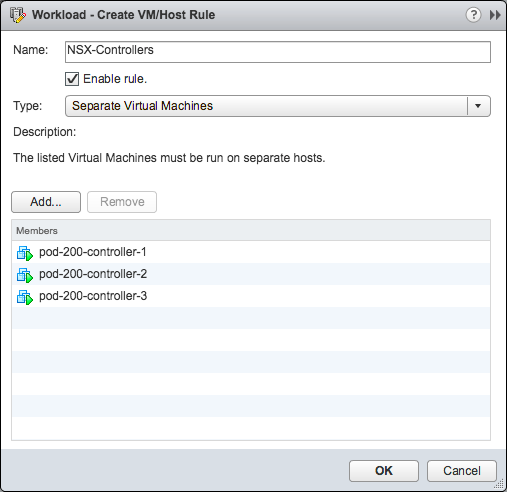
Create DRS Anti-affinity Rules#
One final step is to create an anti-affinity rule for the three Controllers to ensure they run on different hosts, should a host fail, we don’t want a majority loss in the Control Cluster
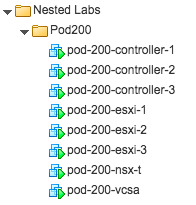
Having completed these steps, my pod now has to following components:
References#