One Node vSAN Lab Host
A little while ago I replaced my three ageing Intel NUC hosts with a single (still ageing) Dell T7500 workstation. The workstation provides 24 processor cores and 96GB RAM for a really reasonable price, while still being quiet enough to sit in my home office. One of the driving factors in retiring the old NUCs was vSAN - I know in the newer generations of NUC you can get an M2 and a SATA SSD in, but my 1st gen. models could only do a single M2.
This new single host presents a challenge though - a single node vSAN is not a supported configuration! To get it working, we have to force vSAN to do things it doesn’t want to do. To this end, let me be very clear: this is not a supported configuration. It is not for production. Don’t do it without understanding the consequences - and don’t put data you can’t afford to lose on it. Back up everything.
Enabling vSAN on a single host
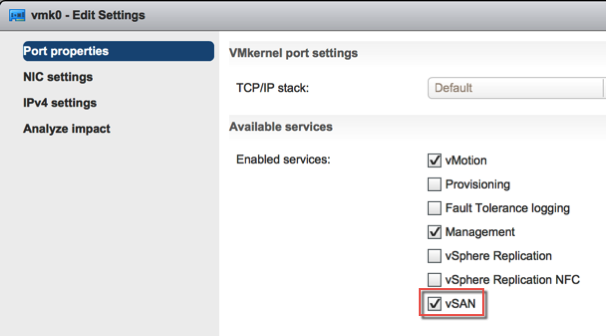
Firstly, enable vSAN on either the existing VMKernel interface, or create a new VMKernel interface for vSAN. If the host is currently standalone (and you’ll deploy vCenter to vSAN later, for example), you can use an esxcli command to “tick the box” using the VMKernel ID (e.g. vmk0):
esxcli vsan network ipv4 add -i vmk0

Next, we need to update the default vSAN policy to allow us to use a single host vSAN. Querying the default policy via esxcli shows that the cluster, vdisk, vmnamespace, vmswap and vmem classes are all configured with a hostFailuresToTolerate (FTT) value of 1, and only vmswap and vmem are configured to _forceProvisioning _(that is, provision if policy is not met).
[root@t7500:~] esxcli vsan policy getdefault
Policy Class Policy Value
------------ --------------------------------------------------------
cluster (("hostFailuresToTolerate" i1))
vdisk (("hostFailuresToTolerate" i1))
vmnamespace (("hostFailuresToTolerate" i1))
vmswap (("hostFailuresToTolerate" i0) ("forceProvisioning" i1))
vmem (("hostFailuresToTolerate" i0) ("forceProvisioning" i1))
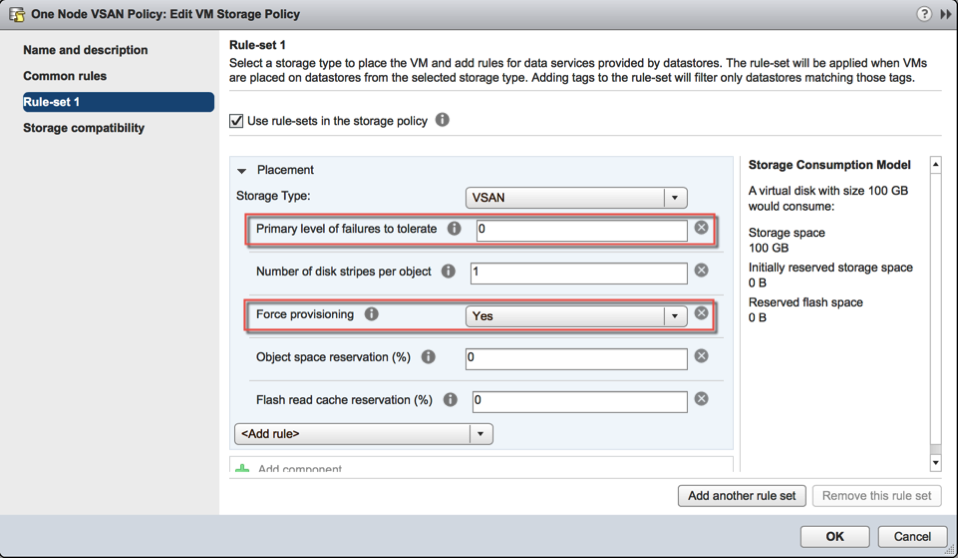
Using esxcli we can update the policy to set the hostFailuresToTolerate to zero, which means vSAN will not attempt to replicate data to mitigate a host failure, and enable forceProvisioning on the cluster, vdisk and vmnamespace objects.
esxcli vsan policy setdefault -c cluster -p "((\"hostFailuresToTolerate\" i0) (\"forceProvisioning\" i1))"
esxcli vsan policy setdefault -c vdisk -p "((\"hostFailuresToTolerate\" i0) (\"forceProvisioning\" i1))"
esxcli vsan policy setdefault -c vmnamespace -p "((\"hostFailuresToTolerate\" i0) (\"forceProvisioning\" i1))"
esxcli vsan policy setdefault -c vmswap -p "((\"hostFailuresToTolerate\" i0) (\"forceProvisioning\" i1))"
Now, re-running the getdefault command shows the policy has updated.
From here you can create your vSAN cluster and claim the disks on the host using esxcli:
esxcli vsan cluster new
esxcli vsan vsan storage add -s <SSD identifier> -d <HDD identifier>
The vSAN storage is now available, and you can deploy your vCenter (or other VMs) to the datastore.
And finally…
If you are running a single node vSAN under vCenter, you’ll want to enable vSAN from within vCenter, and also update the default vSAN policy to match the settings:


