
 Yesterday, Pivotal Container Service 1.1 dropped and, as it’s something I’ve been actively learning in my lab, I wanted to jump on the upgrade straight away. PKS with NSX-T is a really hot topic right now and I think it’s going to be a big part of the future CNA landscape.
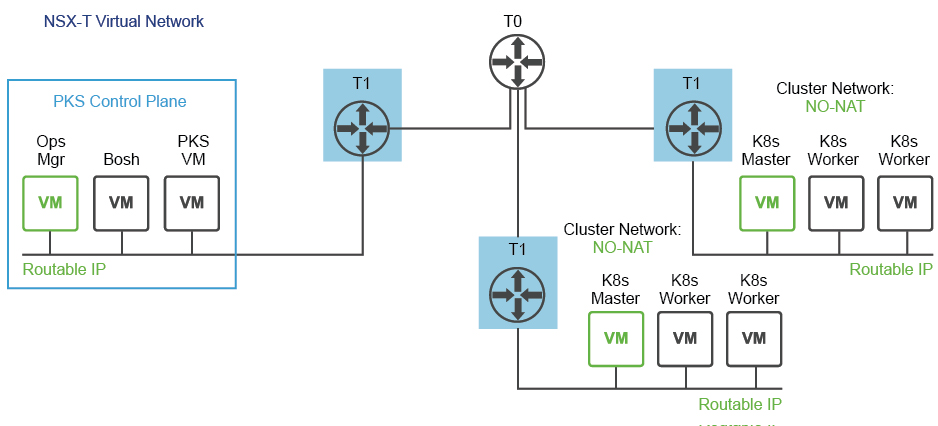
My Lab PKS 1.0.4 deployment is configured as a “NO-NAT with Logical Switch (NSX-T) Topology” as depicted in the diagram below (from the PKS documentation). My setup has these network characteristics:
- PKS control plane (Ops Manager, BOSH Director, and PKS VM) components are using routable IP addresses.
- Kubernetes cluster master and worker nodes are using routable IP addresses.
- The PKS control plane is deployed inside of the NSX-T network. Both the PKS control plane components (VMs) and the Kubernetes Nodes use routable IP addresses.
I used William Lam’s excellent series on PKS with NSX-T to configure a lot of the settings, so I am going to assume a familiarity with that series. If not, I suggest you start there to get a good understanding of how everything is laid out.
Check PKS Prerequisites#
Check the Ops Manager version - PKS 1.1 requires Ops Manager 2.1, you can view your current version by accessing the Ops Manager web interface and the version is listed at the bottom. If it’s not up to date enough, follow the Ops Manager upgrade documentation.
If you chose to upgrade deployed k8s nodes as part of the upgrade you will need to make sure you have at least 3 worker nodes and your workloads are spread across the nodes to ensure workloads are available. Check if PKS k8s deployments are correctly sized, and scale if it’s required (it’ll go red under the Status tab if it’s under pressure!)

Download the binaries#
Download the necessary binaries from the Pivotal Container Service page - mine is vSphere. For the PKS and Kubectl API, download the binary for your “PKS Client” platform - I’m using Linux. Also download the updated Stemcell (linked on the right under Release Details), I am using the Ubuntu Trusty for vSphere one.
- pivotal-container-service-1.1.0-build.311.pivotal
- bosh-stemcell-3586.24-vsphere-esxi-ubuntu-trusty-go_agent.tgz
- pks-linux-amd64-1.1.0-build.301
- kubectl-linux-amd64-v1.10.3

Upgrade PKS Tile#
From the Ops Manager home page, click on “Import a Product” and select the pivotal-container-service-1.1.0-build.311.pivotal - it’s a 3.7GB file, so it may take a while to update. Once it’s uploaded, click the + symbol to add the updated version to the Installation Dashboard.

The Pivotal Container Service tile will turn orange to indicate it has changes, and a link to show that an updated stemcell is required appears. You can click on this link, or the STEMCELL LIBRARY link to upload the new stemcell.

Click IMPORT STEMCELL and select bosh-stemcell-3586.24-vsphere-esxi-ubuntu-trusty-go_agent.tgz to import the new stemcell

Finally, apply the stemcell to the new Pivotal Container Service product.

Configure the PKS tile#
The PKS tile will now be orange, but the changes can’t be applied until some extra configuration is added - click on the tile to open the Settings page
Under the Networking page, we have to add a certificate for the NSX user, move to an IP Block for the k8s node IP addressing, and add a DNS server configuration.
Generate a Super User Principal Identity#
First up, we need create a certificate that will “represents a principal identity with superuser permissions that the PKS VM will use to communicate with NSX-T”. Follow the instructions in this document (6.1) https://docs.vmware.com/en/VMware-Pivotal-Container-Service/1.1/vmware-pks-11/GUID-PKS11-installing-nsx-t.html. I ran the following on my pks-client Ubuntu server.
Firstly, export some variables to use in the commands:
NSX_MANAGER="192.168.10.35"
NSX_USER="admin"
NSX_PASSWORD=‘VMware1!'
PI_NAME="pks-nsx-t-superuser"
NSX_SUPERUSER_CERT_FILE="pks-nsx-t-superuser.crt"
NSX_SUPERUSER_KEY_FILE="pks-nsx-t-superuser.key"
NODE_ID=$(cat /proc/sys/kernel/random/uuid)
Now generate a private key and certificate:
openssl req \
-newkey rsa:2048 \
 -x509 \
 -nodes \
 -keyout "$NSX_SUPERUSER_KEY_FILE" \
 -new \
 -out "$NSX_SUPERUSER_CERT_FILE" \
 -subj /CN=pks-nsx-t-superuser \
 -extensions client_server_ssl \
 -config <(
 cat /etc/ssl/openssl.cnf \
 <(printf '[client_server_ssl]\nextendedKeyUsage = clientAuth\n')
 ) \
 -sha256 \
 -days 730
Generating a 2048 bit RSA private key
………………………………………………………………………………………………………………………….+++
……………..+++
writing new private key to ‘pks-nsx-t-superuser.key’
—-
Create a variable with the certificate API request:
cert_request=$(cat <<END
{
"display_name": "$PI_NAME",
"pem_encoded": "$(awk '{printf "%s\\n", $0}' $NSX_SUPERUSER_CERT_FILE)"
}
END)
Then POST the request to the NSX API:
curl -k -X POST \
"https://${NSX_MANAGER}/api/v1/trust-management/certificates?action=import" \
-u "$NSX_USER:$NSX_PASSWORD" \
-H 'content-type: application/json' \
-d "$cert_request"
You can validate the certificate is installed in the NSX-T Manager interface under System > Trust > Certificates

Copy the “id” value from the response of the previous API call and create a variable:
CERTIFICATE_ID="a59f9a4f-c18c-49e8-8934-fca545d7ad93"Then create a variable to hold the API call to register the principal:
pi_request=$(cat <<END
{
"display_name": "$PI_NAME",
"name": "$PI_NAME",
"permission_group": "superusers",
"certificate_id": "$CERTIFICATE_ID",
"node_id": "$NODE_ID"
}
END)
And POST the call to NSX-T Manager to create it:
curl -k -X POST \
"https://${NSX_MANAGER}/api/v1/trust-management/principal-identities" \
-u "$NSX_USER:$NSX_PASSWORD" \
-H 'content-type: application/json' \
-d "$pi_request"
Finally, validate the certificate and key by using them to make a simple GET query on the API:
curl -k -X GET \
"https://${NSX_MANAGER}/api/v1/trust-management/principal-identities" \
--cert $(pwd)/"$NSX_SUPERUSER_CERT_FILE" \
--key $(pwd)/"$NSX_SUPERUSER_KEY_FILE"
Add the Certificate and Key to the PKS Tile#
Back in Ops Manager, click on the Pivotal Container Service tile and select the Networking settings tab. Paste the contents of the .crt file into the Certificate field, and the .key contents into the Key field.

Configure the IP Block ID, Nodes DNS, and NAT mode#
Next, further down the Networking page we need to add an NSX-T IP Block ID for the k8s nodes. If, like me, you followed William Lam’s configuration, part of the Ops Manager/BOSH setup was to configure a “Service Network” for the k8s nodes, on the 10.10.0.0/24 subnet. In PKS 1.0 this Service Network was used to configure the IP addresses for the Kubernetes nodes. In PKS 1.1 the IP Block is used, with the first IP being assigned to the t1 router for the k8s cluster.
With this configuration (thanks to Francis Guillier for his help to understand):
- k8s clusters deployed with PKS 1.0 will still live on service network (with a scale up event, for instance, new k8s worker nodes will be connected to this service network
- new K8s clusters will be deployed using the Node IP Block (/24 allocated to this cluster)
In order to complete the upgrade, I needed to create a new IP Block in NSX-T that mirrors the Service Network:

Copy/paste the ID from NSX-T into the Nodes IP Block ID, disable the NAT mode checkbox and enter a DNS server IP for the Kubernetes Nodes.

Finally, click Save at the bottom of the page!
Configure the CEIP and Telemetry Options#

Validate the Errands Configuration#
Last but not least, validate that the Post-Deploy Errands for NSX-T Validation, and Upgrade all clusters are set to On - this ensures NSX-T is configured correctly, and that all Kubernetes Nodes are upgraded.

Save the configuration and go back to the Installation Dashboard
Running the Upgrade#
From the installation Dashboard, click “Apply changes” to begin the upgrade process!

Depending on your environment this can take a while - you can follow along by showing the verbose output on the Applying Changes page

Upgrading the PKS and Kubectl CLIs#
Upgrading the CLIs is simply a case of uploading the binaries, chmod to allow execution, then moving to the correct folder:
sudo chmod +x pks-linux-amd64-1.1.0-build.301
sudo mv pks-linux-amd64-1.1.0-build.301 /usr/local/bin/pks
sudo chmod +x kubectl-linux-amd64-v1.10.3
sudo mv kubectl-linux-amd64-v1.10.3 /usr/local/bin/kubectl
You can then validate the installed version with kubectl version