
Following on from me recent post deploying Kubernetes with the NSX-T CNP, I wanted to extend my environment to make use of the vSphere Cloud Provider to enable Persistent Volumes backed by vSphere storage. This allows me to use Storage Policy to create Persistent Volumes based on policy. For example, I’m going to create two classes of storage, Fast and Slow - Fast will be vSAN based and Slow will be NFS based.
I highly recommend you review the previous post in order to familiarise yourself with the environment.
As always, I’m doing this in my lab as a learning exercise, and blogging it as a way of making sure I understand what I’m doing! I often stand on the shoulders of others, and in this case it is Myles Gray who deserves most of the credit. Again I am lucky to be able to poke Myles on our corporate slack, but you can also check out his Kubernetes on vSphere series which was immensely helpful.
VM Pre-requisites#
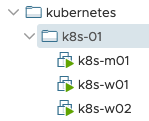
All the Kubernetes Node VMs need to be placed in a VM folder that’s used to
identify them. I’ve created folder /kubernetes/k8s-01 to reflect the name of
the Kubernetes cluster
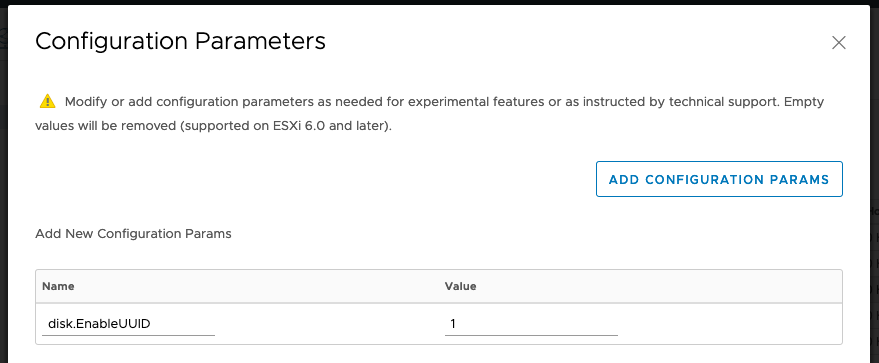
In addition, the Kubernetes Node VMs need to have an advanced setting configured
disk.EnableUUID=1. You can configure this in the vSphere Web Client, or via
PowerCLI/govc. The VMs need to be shut down for the change to take effect. The
vSphere Cloud
Provider
docs say:
This step is necessary so that the VMDK always presents a consistent UUID to the VM, thus allowing the disk to be mounted properly.
Create Roles and Service Account#
Create the required Roles#
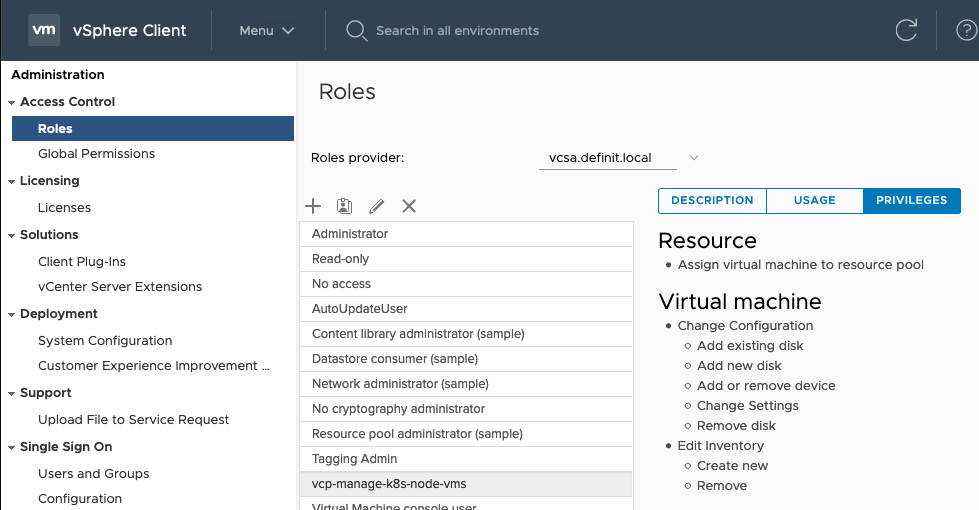
The roles and permissions required for dynamic provisioning can be found here.
| Roles | Privileges | Entities | Propagate to Children |
|---|---|---|---|
| vcp-manage-k8s-node-vms | Resource.AssignVMToPoolVirtualMachine.Config.AddExistingDisk, VirtualMachine.Config.AddNewDisk, VirtualMachine.Config.AddRemoveDevice, VirtualMachine.Config.RemoveDisk, VirtualMachine.Config.SettingsVirtualMachine.Inventory.Create, VirtualMachine.Inventory.Delete | Cluster, Hosts, VM Folder | Yes |
| vcp-manage-k8s-volumes | Datastore.AllocateSpace, Datastore.FileManagement (Low level file operations) | Datastore | No |
| vcp-view-k8s-spbm-profile | StorageProfile.View (Profile-driven storage view) | vCenter | No |
| Read-only (pre-existing default role) | System.Anonymous, System.Read, System.View | Datacenter, Datastore Cluster, Datastore Storage Folder | No |
- Navigate in the vSphere Client - Menu > Administration > Roles
- Add a new Role and select the permissions required. Repeat for each role.
Create a service account#
Create a vsphere.local user, or add a domain user, to provide access and assign the new roles to.
- [email protected]
- VMware1!
Configure account roles and permissions#
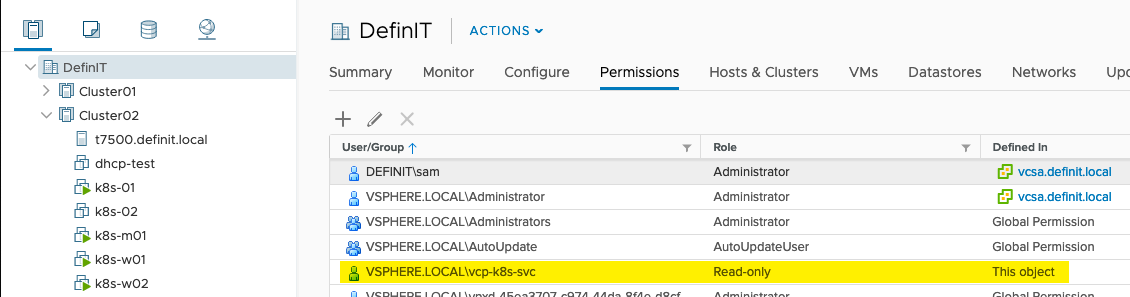
Assign the role vcp-manage-k8s-node-vms to the vcp-k8s-svc account on the Cluster and VM folder in which your Kubernetes nodes run, ensure the “Propagate to children” is ticked.
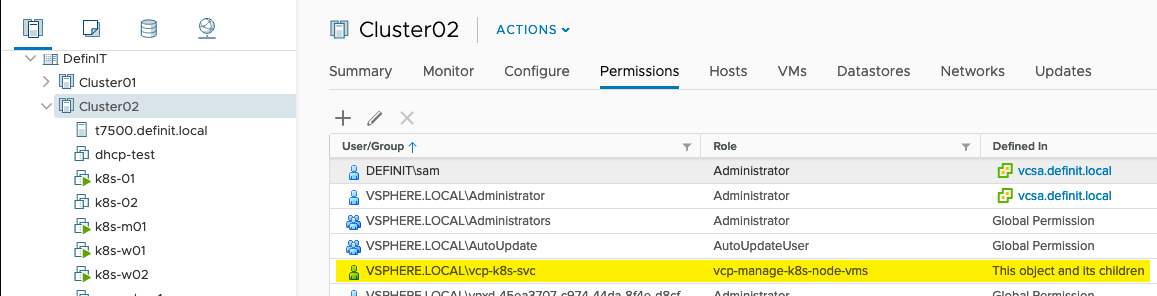
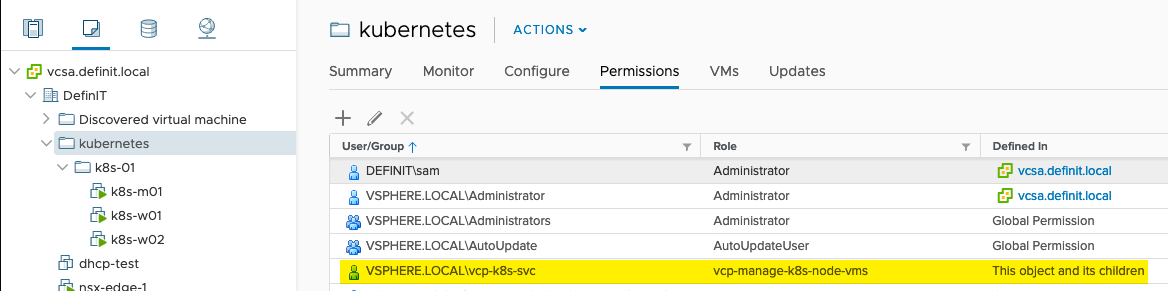
Since I’ll be using two different storage policies, I’ve added the vcp-manage-k8s-volumes to both the vSAN and NFS datastores.
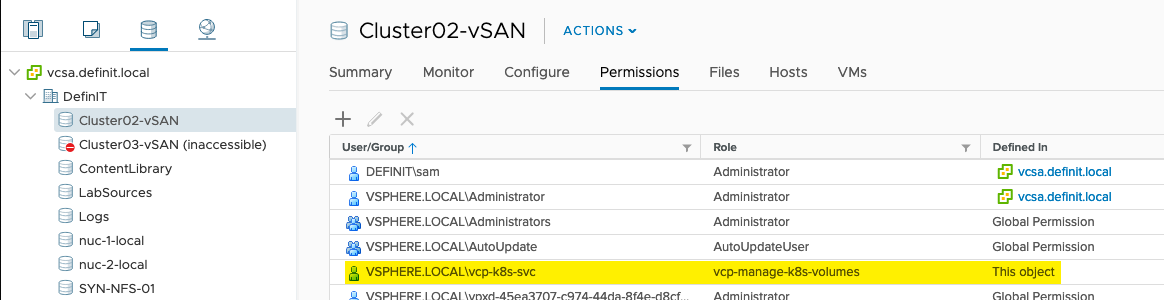
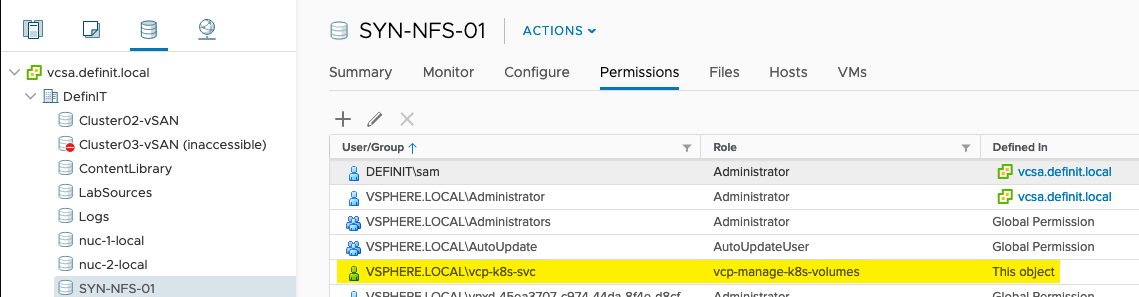
Configure the vcp-view-k8s-spbm-profile role on the vCenter object
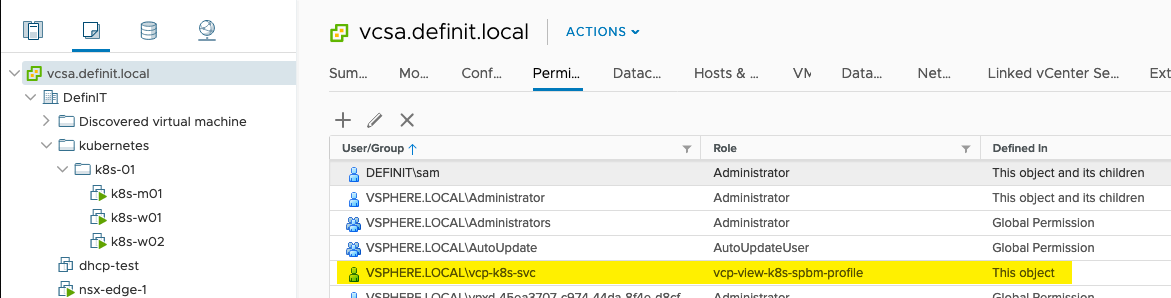
Finally, add the Read-only role to the Datacenter (and any Datastore Cluster or Datastore Folder, if you have them).
Create a Kubernetes Secret#
To secure the vSphere credentials they can be stored as a Kubernetes Secret. First, covert the credentials to base64:
echo -n '[email protected]' | base64
echo -n 'VMware1!' | base64
Create vcp-credentials.yaml with the base64 encoded credentials
apiVersion: v1
kind: Secret
metadata:
 name: vcp-vcenter
type: Opaque
data:
   vcsa.definit.local.username: dmNwLWs4cy1zdmNAdnNwaGVyZS5sb2NhbA==
   vcsa.definit.local.password: Vk13YXJlMSE=
Create the secret using kubectl in the kube-system namespace:
kubectl create -f vcp-credentials.yaml --namespace=kube-systemValidate the secret is visible, but not the passwords
kubectl describe secret vcp-vcenter --namespace=kube-system

Name:         vcp-vcenter
Namespace:    kube-system
Labels:       <none>
Annotations:  <none>

Type:  Opaque

Data
====
vcsa.definit.local.password:  8 bytes
vcsa.definit.local.username:  25 bytes
#Configuring the Kubernetes vSphere Cloud Provider ##On the Kubernetes Master node
Create vsphere.conf#
Create the vSphere configuration file in /etc/kubernetes/vcp/vsphere.conf - you’ll need to create the folder.
[Global]
        # Global settings are defaults for all VirtualCenters defined below
        secret-name = "vcp-vcenter"
        secret-namespace = "kube-system"
        port = "443"
        insecure-flag = "1"

[VirtualCenter "vcsa.definit.local"]
        datacenters = "DefinIT"

[Workspace] # Defines
        server = "vcsa.definit.local"
        datacenter = "DefinIT"
        default-datastore = "SYN-NFS-01"
        resourcepool-path = "Cluster02/Resources"
        folder = "kubernetes/k8s-01"

[Disk]  # Required...
        scsicontrollertype = pvscsi
Modify the kubelet service#
The vSphere Storage for Kubernetes docs are a little out of date on this - you don’t modify the systemd unit file directly (which is likely to be overwritten in upgrades). Instead there’s an environment file referenced in the
Append the --cloud-provider and --cloud-config flags to
/var/lib/kubelet/kubeadm-flags.env
KUBELET_KUBEADM_ARGS=--cgroup-driver=cgroupfs --network-plugin=cni --pod-infra-container-image=k8s.gcr.io/pause:3.1 --cloud-provider=vsphere --cloud-config=/etc/kubernetes/vcp/vsphere.confModify container manifests#
The container manifests for the Kubernetes API server and controller also need
to be updated with the --cloud-provider and --cloud-config flags. These are
located in the /etc/kubernetes/manifests folder.
Add the following to the spec:containers:command array, paying attention to
whitespace (it is yaml, after all!)
    - --cloud-provider=vsphere
    - --cloud-config=/etc/kubernetes/vcp/vsphere.conf
We also need add a mount for the vsphere.conf file location in
spec:containers:volumeMounts
    - mountPath: /etc/kubernetes/vcp
      name: vcp
      readOnly: true
And a volume in spec:volumes
  - hostPath:
      path: /etc/kubernetes/vcp
      type: DirectoryOrCreate
    name: vcp
On the Kubernetes Worker nodes#
Modify the kubelet service#
Append the --cloud-provider flag to /var/lib/kubelet/kubeadm-flags.env
KUBELET_KUBEADM_ARGS=--cgroup-driver=cgroupfs --network-plugin=cni --pod-infra-container-image=k8s.gcr.io/pause:3.1 --cloud-provider=vsphereUpdate the Node Provide IDs#
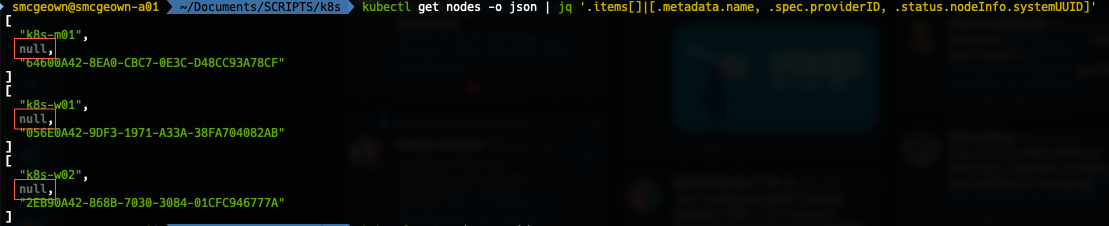
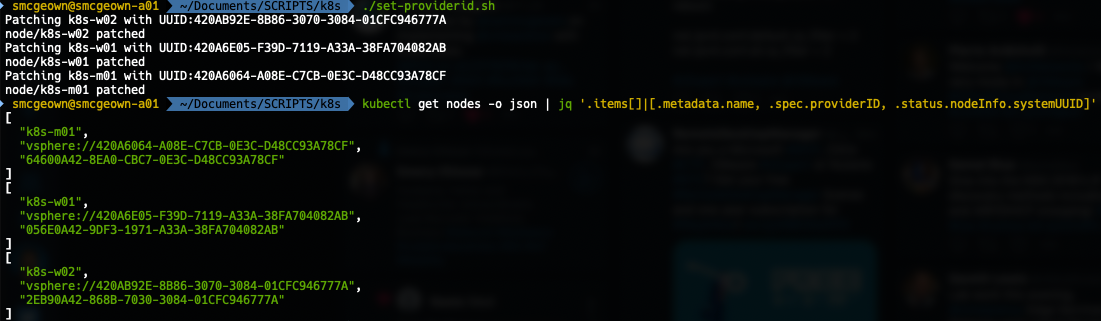
Each Kubernetes node will need a *providerId *set so that the the created
volumes are mounted to the correct node. The manual method for doing this is to
look up the VM’s UUID in vSphere, then patch the node configuration with
kubectl with the providerId spec. You can check if the providerId is set by
running:
kubectl get nodes -o json | jq '.items[]|[.metadata.name, .spec.providerID, .status.nodeInfo.systemUUID]'If the output contains null for the providerId, then you need to set it:
Fortunately the documentation provides a hand script for doing so, it just needs govc, jq and kubectl configured on each machine. If you’re running on macOS like me, you can use homebrew to install what you need.
Consuming vSphere Storage#
Create Storage Class#
To consume the new storage provider, we need to create some storage classes. I’ve got two vSphere Storage Policies configured - one for vSAN “One-node vSAN Policy", and one for NFS “NFS-Storage". The vSAN policy is the default policy for my vSAN provider on the host the nodes run on, and the NFS policy is a tag-based policy that will allow placement on any datastore tagged with the “NFS” tag.
To use these policies I’m creating two storage classes - *fast *for vSAN:
# sc-vsan-policy.yaml
kind: StorageClass
apiVersion: storage.k8s.io/v1
metadata:
  name: fast
provisioner: kubernetes.io/vsphere-volume
parameters:
    storagePolicyName: "One-node vSAN Policy"
    datastore: Cluster02-vSAN
And slow, for NFS:
# sc-nfs-policy.yaml
kind: StorageClass
apiVersion: storage.k8s.io/v1
metadata:
  name: slow
provisioner: kubernetes.io/vsphere-volume
parameters:
    diskformat: thin
    storagePolicyName: "NFS-Storage"
The policies are imported using the kubectl apply -f sc-vsan-policy.yaml
command, and we can check the policy is created by using the kubectl describe storageclaim fast command.
Create a Persistent Volume Claim#
To be able to consume the Storage Class we need to create a persistent volume claim, or pvc, that uses the storage class:
# pvc-vsan.yaml
kind: PersistentVolumeClaim
apiVersion: v1
metadata:
  name: pvc-vsan
  annotations:
    volume.beta.kubernetes.io/storage-class: fast
spec:
  accessModes:
    - ReadWriteOnce
  resources:
    requests:
      storage: 2Gi
# pvc-nfs.yaml
kind: PersistentVolumeClaim
apiVersion: v1
metadata:
name: pvc-nfs
annotations:
volume.beta.kubernetes.io/storage-class: slow
spec:
accessModes:
- ReadWriteOnce
resources:
requests:
storage: 2GiAgain, these can be imported using the kubectl apply command, and examined with the kubectl describe command
kubectl create -f pvc-vsan.yaml
kubectl create -f pvc-nfs.yaml
kubectl describe pvc
Name: pvc-nfs
Namespace: default
StorageClass: slow
Status: Bound
Volume: pvc-3d6ac709-92af-11e9-ba0c-0050568aec2b
Labels: <none>
Annotations: pv.kubernetes.io/bind-completed: yes
pv.kubernetes.io/bound-by-controller: yes
volume.beta.kubernetes.io/storage-class: slow
volume.beta.kubernetes.io/storage-provisioner: kubernetes.io/vsphere-volume
Finalizers: [kubernetes.io/pvc-protection]
Capacity: 2Gi
Access Modes: RWO
VolumeMode: Filesystem
Events:
Type Reason Age From Message
---- ------ ---- ---- -------
Normal ProvisioningSucceeded 22s persistentvolume-controller Successfully provisioned volume pvc-3d6ac709-92af-11e9-ba0c-0050568aec2b using kubernetes.io/vsphere-volume
Mounted By: <none>
Name: pvc-vsan
Namespace: default
StorageClass: fast
Status: Bound
Volume: pvc-3f3363ee-92af-11e9-ba0c-0050568aec2b
Labels: <none>
Annotations: pv.kubernetes.io/bind-completed: yes
pv.kubernetes.io/bound-by-controller: yes
volume.beta.kubernetes.io/storage-class: fast
volume.beta.kubernetes.io/storage-provisioner: kubernetes.io/vsphere-volume
Finalizers: [kubernetes.io/pvc-protection]
Capacity: 2Gi
Access Modes: RWO
VolumeMode: Filesystem
Events:
Type Reason Age From Message
---- ------ ---- ---- -------
Normal ProvisioningSucceeded 19s persistentvolume-controller Successfully provisioned volume pvc-3f3363ee-92af-11e9-ba0c-0050568aec2b using kubernetes.io/vsphere-volume
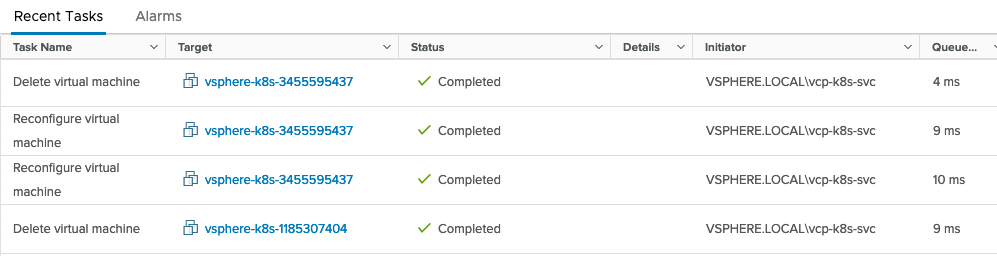
Mounted By: <none>All being well, you should see some events initiated by the service account:
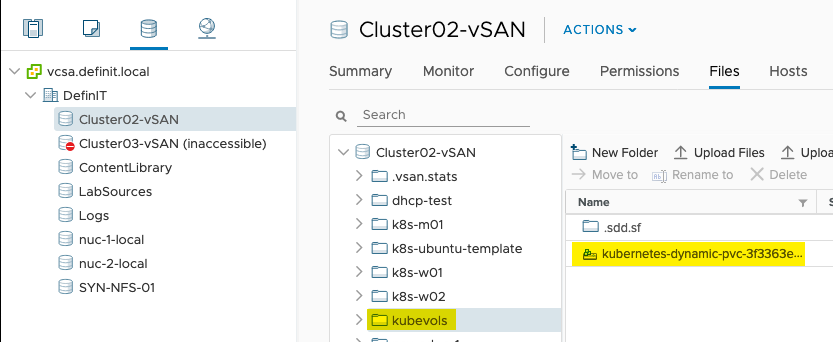
And if you check in the configured datastores, there should now be a kubevols folder and the disk provisioned by the pvc - vSAN:
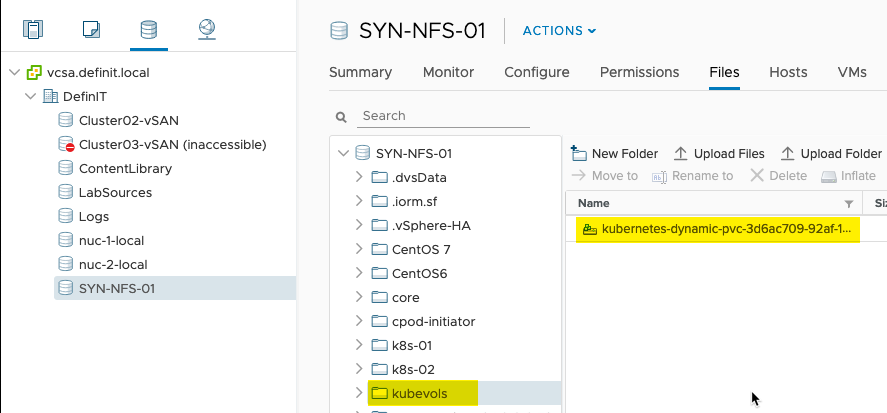
And NFS
At this point, you can consume the persistent volumes as you do for any pod.