
I love Raspbery Pis - I have done since they first released them, all the way up to the present iteration, the Raspberry Pi 4. They’re phenominal little bits of kit, endlessly hackable and because of their really low price, they open up computing to a huge number of people who otherwise wouldn’t get the opportunity.
One of the irritating things, though, about running Raspberry Pis is that they typically boot from an SD card. SD cards are notorious for having high attrition rates, especially if you’re reading/writing to them regularly. Running a Kubernetes cluster on my Raspberry Pis is especially hard on the SD card because you’re not only running the system’s read and writes, but you’re also running containers and their I/O on the card.
PXE booting the Raspberry Pis will allow me to back the OS and containers with my Synology NAS, and to forget the headache of SD card fatigue! There are three steps to configuring PXE boot for my Pis:
- Configure the DHCP Server
- Configure the NFS and TFTP Server
- Configure the Raspberry Pi
Configure DHCP Server#
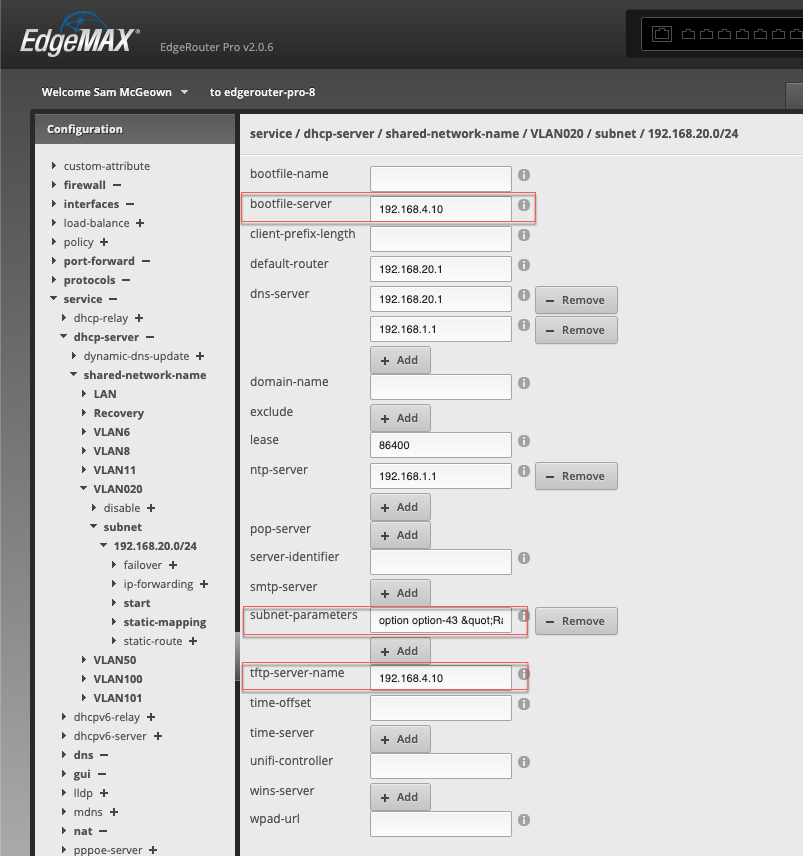
In order for the Raspberry Pi to know where to boot from, we need too configure the DHCP server with some specific options. In my home network DHCP is running from my Ubiquiti EdgeRouter Pro 8. DHCP Option 43 is used to exchange “vendor-specific information” - in this case we need to tell the Raspbery Pi that we have a PXE boot available for it. On my network I’ve configured a DHCP server for RPi called VLAN020.
# Define option 43
set service dhcp-server global-parameters "option option-43 code 43 = string;"
# Set option 43 to "Raspberry Pi Boot " - the spaces are to fix a legacy bug with the old boot controller
set service dhcp-server shared-network-name VLAN020 subnet 192.168.20.0/24 subnet-parameters "option option-43 "Raspberry Pi Boot ";"
# Configure the bootfile-server and tftp-server-name
set service dhcp-server shared-network-name VLAN020 subnet 192.168.20.0/24 bootfile-server 192.168.4.10
set service dhcp-server shared-network-name VLAN020 subnet 192.168.20.0/24 tftp-server-name 192.168.4.10
In the WebUI, it looks like this:
Configure NFS and TFTP Server#
I’ve configured two shared folders on my Synology NAS - rpi-pxe and rpi-tftpboot.
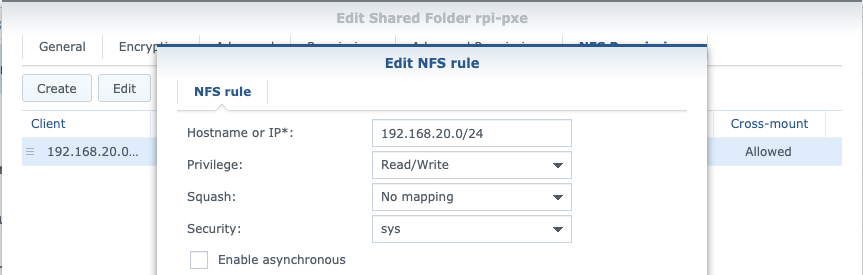
rpi-pxe is shared as an NFS export, with read/write permissions to mount from my Raspbery Pi subnet. Since we’re using this as a Linux boot device, we must not enable root squash (No mapping) and it should be synchronous.
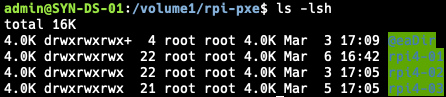
Inside the rpi-pxe share I have created a new folder for each of my Pis and used chmod 777 to enable full permissions on the share. Each Pi will copy it’s root file system into it’s respective folder, and boot from there.
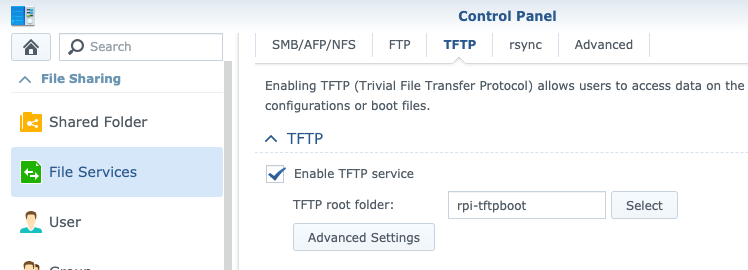
rpi-tftproot is shared as an NFS share in the same way, but also as the TFTP server using the File Services settings on the Synology. The folders and content required will be created later on.
Configure Raspberry Pi Boot#
Now that the infrastucture is in place to PXE boot the Pis, it’s time to configure the Pis themselves. I’m assuming you’ve got a Pi already running and configured - this can be a fresh install of Rasbian or one that’s been running a while - it doesn’t much matter. I performed these steps on all of my Pis, from the SD booted install.
Several of the steps need to use the Pi’s serial number, so make a note of the output:
# Get the Serial
vcgencmd otp_dump | grep 28: | sed s/.*://g
# output was: c42356f3
Configure EEPROM#
Firstly, we need to configure the EEPROM to boot from the network - by default it will only boot from the SD card.
# Update
sudo apt-get update
# Upgrade
sudo apt-get full-upgrade
# Install the latest EEPROM binaries
sudo apt install rpi-eeprom
# Copy the latest EEPROM binary
cp /lib/firmware/raspberrypi/bootloader/stable/pieeprom-2020-01-17.bin pieeprom.bin
# Export the default settings to a file
rpi-eeprom-config pieeprom.bin > bootconf.txt
# Edit the settings file and change the BOOT_ORDER to 0x21
vim bootconf.txt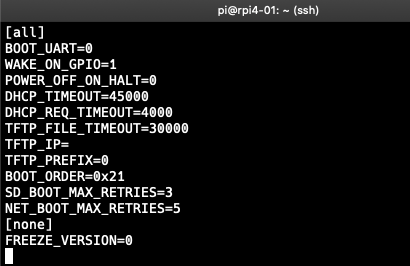
# Create a new EEPROM binary with the settings embedded
rpi-eeprom-config --out pieeprom-new.bin --config bootconf.txt pieeprom.bin
# Install the new EEPROM binary
sudo rpi-eeprom-update -d -f ./pieeprom-new.bin
# Reboot
sudo reboot
Copy Root to NFS server#
Once the Pi has rebooted we need to copy the root partition to the NFS server. I created a directory in the rpi-pxe share for the Pi rpi4-01 and ensured the write permissions were 777. You might need to install rsync using sudo apt-get install rsync.
mkdir -p /nfs/rpi4-01
sudo mount 192.168.4.10:/volume1/rpi-pxe/rpi4-01 /nfs/rpi4-01
# Copy the root OS partition to the NFS share, excluding the NFS mount
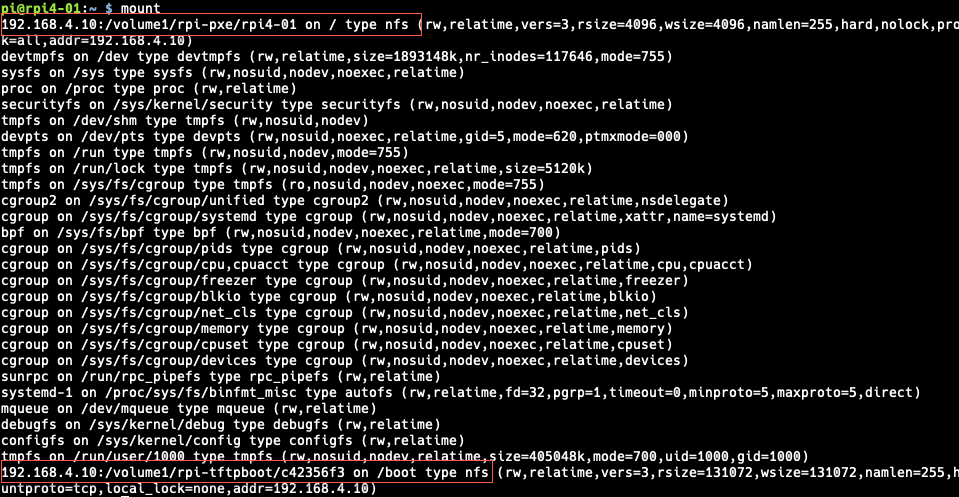
sudo rsync -xa --progress --exclude /nfs / /nfs/rpi4-01/Once the copy has completed (grab a coffee, it’ll take a while) edit the /etc/fstab in the NFS share (so /nfs/rpi4-01/etc/fstab for me) and remove the existing configuration (only the proc line should be left). Mount the TFTP boot share as the /boot partition - the fstab file should look like this:
proc            /proc           proc    defaults          0       0
192.168.4.10:/volume1/rpi-tftpboot/c42356f3 /boot nfs defaults,vers=3,proto=tcp 0 0
Copy Boot files to TFTP server#
To create a bootable TFTP folder, we need to copy the contents of /boot to the TFTP server. To do this I simply mounted the rpi-tftpboot folder as an NFS share in my Pi. The Raspberry Pi 4 bootloader will look for bootable files in a folder corresponding to its serial in the TFTP root directory. In the example below I am creating a folder based on the serial and copying the boot files there. This allows a cmdline.txt for each Pi, which lets me specify where the root of the OS is. It also means that I can update the boot files for each Pi individually.
sudo mount 192.168.4.10:/volume1/rpi-tftpboot /nfs/rpi-tftpboot
mkdir -p /nfs/rpi-tftpboot/c42356f3
sudo cp -r /boot/* /nfs/pxe-tftpboot/c42356f3
Next edit the cmdline.txt file in the new TFTP boot directory and replace the root partition with the NFS partition.
console=serial0,115200 console=tty1 root=/dev/nfs nfsroot=192.168.4.10:/volume1/rpi-pxe/rpi4-01,vers=3 rw ip=dhcp elevator=deadline rootwaitBoot your Pi!#
All being well, you can now shutdown the Pi, remove the SD card and boot via PXE!
If you encounter problems booting, double check the steps have been completed correctly:
- Validate the EEPROM configuration (you’ll have to boot the Pi with the SD card again) using
vcgencmd bootloader_configand make sure theBOOT_ORDERis set to0x21 - Watch the DHCP logs on the EdgeRouter by logging to file
- View the TFTP logs on the Synology using
tail -f /var/log/opentftp.log