
If you’re anything like me, your home lab is constantly changing, evolving, breaking, rebuilding. For the last year or so I’ve been running all my home kubernetes workloads on a Raspberry Pi cluster - and it’s been working really well!
I’ve been through several iterations - for example firstly running on SD cards (tl;dr - it’s bad, they wear out really fast with Kubernetes on board!), then PxE booting them from my Synology to it’s now current state of booting directly from SSDs. I’ve also moved from Raspberry Pi 3s to 4s, I’ve played around with stacking cluster cases before landing on the current rack-mount format.
Previous iterations of my setup (at least from a configuration and installation point of view) are hidden away in a private git repository, and one day I’d like to make that public, but for now it’s too messy and holds too many skeletons secrets. So this post is my “current state” as of September 2020, with my configuration more or less intact.
Hardware#
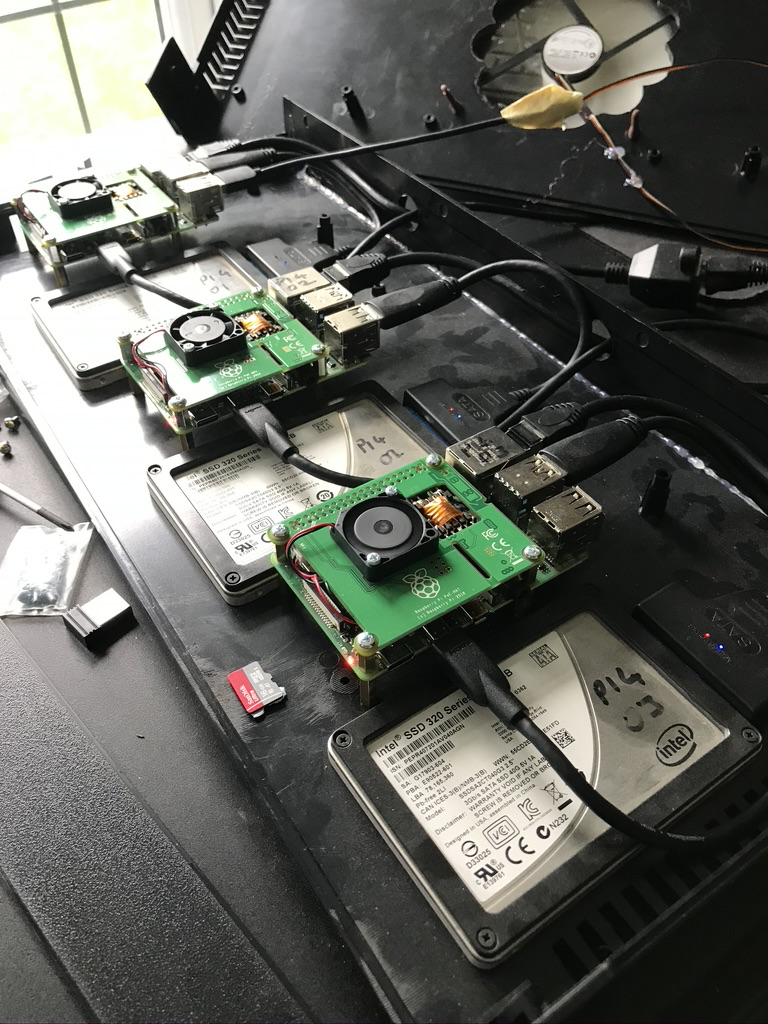
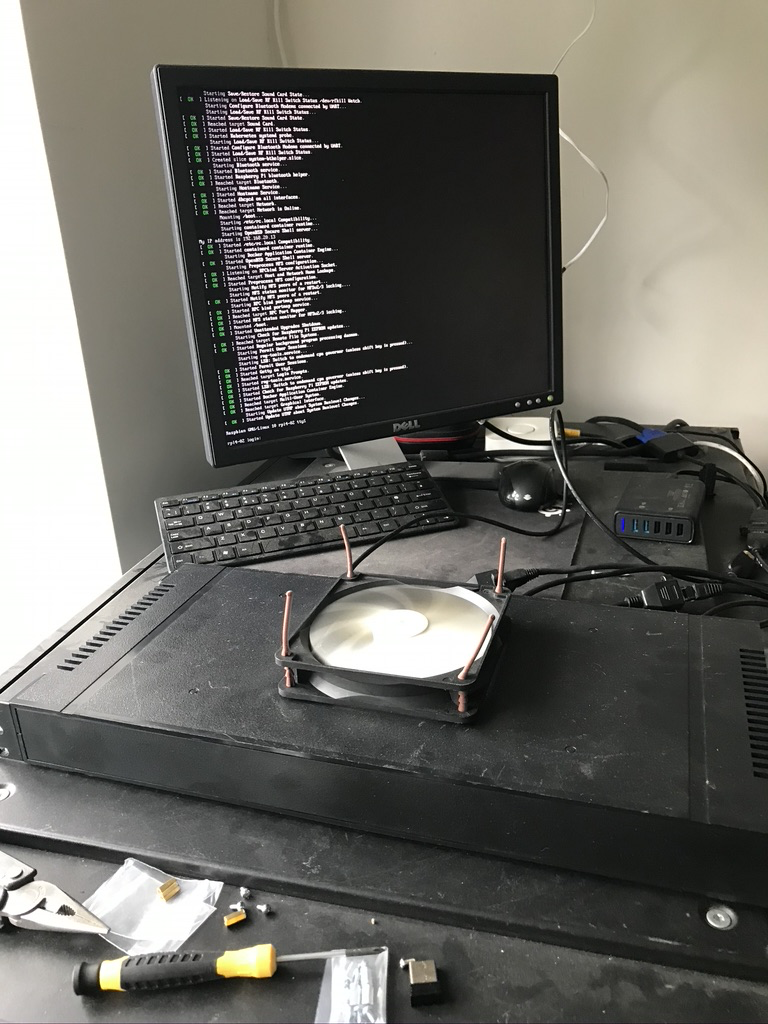
I’m running three raspberry Pi nodes mounted inside a 1U 19" rack case, which I modified to accomodate the Pis. I also added a large case fan, wired to USB for power, on top of the case to drive cooling air through the case. It’s a little hacky, but it works well.
- Raspberry Pi 4 (4GB)
- Raspberry Pi PoE HAT v2
- Intel 120GB SSD - cheapest I could find!
- ELUTENG USB 3.0 to SATA Cable
- 19" Rack Mount Box 1U
- USB, Cat5 and HDMI extender cables
The PoE hats provide all the power that’s needed for the Pis, with the added benefit of having a temperature controlled mini-fan onboard. I am using a Cisco SG300-10 PoE switch to provide 802.3af PoE.
Booting from USB SSD#
Booting the RPi4s from the USB SSD directly is now supported directly from the latest EEPROM (2020-09-03 or newer), which is a lot easier than the previous Beta versions. Simply update the bootloader and reboot
sudo apt update
sudo apt full-upgrade
sudo rpi-eeprom-update -a -d
sudo reboot now
Once you’ve rebooted you can use sudo raspi-config to set the boot order, assuming you do not want a more complicated boot configuration. This sets BOOT_ORDER=0xf41 - f = loop, 4 = USB, 1 = SD Card.
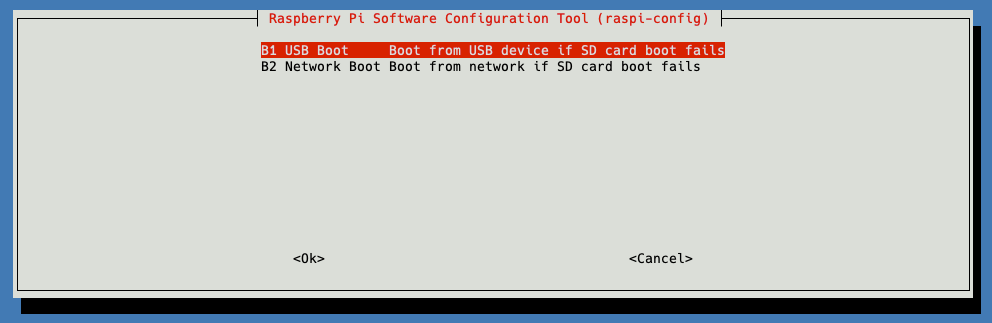
You can then install your desired OS flavour on the USB SSD - I’m currently running Raspbian Buster, but I’ve heard good things about the Ubuntu 20.04 arm64 build - it’s on my to do list.
Installing Kubernetes#
At the time of writing Kubernetes 1.19.2 is the most recent version, I’ve found that installing on Rasbian requires a little more fettling to get working than a “normal” distro
Installing Docker#
Docker needs to be installed, cgroups enabled and then the docker daemon configured:
# Obligatory updates
sudo apt-get update && sudo apt-get upgrade -y
# Install pre-requisities
sudo apt-get install apt-transport-https ca-certificates software-properties-common vim -y
# Install Docker
curl -fsSL get.docker.com -o get-docker.sh
sh get-docker.sh
# Add Pi user to Docker group
sudo usermod -aG docker pi

# Backup the current cmdline.txt
sudo cp /boot/cmdline.txt /boot/cmdline_cgroup.txt
# Enable cgroups
orig="$(head -n1 /boot/cmdline.txt) cgroup_enable=cpuset cgroup_memory=1 cgroup_enable=memory"
echo $orig | sudo tee /boot/cmdline.txt

# Edit Docker daemon
sudo bash -c 'cat << EOF > /etc/docker/daemon.json
{
  "exec-opts": ["native.cgroupdriver=systemd"],
  "log-driver": "json-file",
  "log-opts": {
    "max-size": "100m"
  },
  "storage-driver": "overlay2"
}
EOF'

sudo reboot
I’ve configured legacy versions of iptables for compatibility since Raspbian Buster uses nftables by default. I’ve also disabled swap and then added the Kubernetes repository to apt.
# Ensure legacy iptables binaries are installed and used
sudo apt-get install -y iptables arptables ebtables
sudo update-alternatives --set iptables /usr/sbin/iptables-legacy
sudo update-alternatives --set ip6tables /usr/sbin/ip6tables-legacy
sudo update-alternatives --set arptables /usr/sbin/arptables-legacy
sudo update-alternatives --set ebtables /usr/sbin/ebtables-legacy

# Disable swap
sudo dphys-swapfile swapoff
sudo dphys-swapfile uninstall
sudo update-rc.d dphys-swapfile remove
sudo systemctl disable dphys-swapfile.service

# If you're using flannel...
# sudo sysctl -w net.bridge.bridge-nf-call-iptables=1

# Add the Kubernetes repo
curl -s https://packages.cloud.google.com/apt/doc/apt-key.gpg | sudo apt-key add -
echo "deb http://apt.kubernetes.io/ kubernetes-xenial main" | sudo tee /etc/apt/sources.list.d/kubernetes.list
sudo apt-get update -q

# Install Kubernetes binaries (v1.19.2-00) and hold any upgrades
sudo apt-mark unhold kubelet kubeadm kubectl
sudo apt-get install -y kubelet=v1.19.2-00 kubeadm=v1.19.2-00 kubectl=v1.19.2-00
sudo apt-mark hold kubelet kubeadm kubectl

# Pre-stage the kubernetes images
sudo kubeadm config images pull
I always like add the members of your cluster to /etc/hosts for name resolution (especially as I use CoreDNS running on this cluster for my home DNS!)
# Add to /etc/hosts
192.168.20.9    rpi-vip rpi-vip.lab.definit.co.uk
192.168.20.12   rpi4-01 rpi4-01.lab.definit.co.uk
192.168.20.13   rpi4-02 rpi4-02.lab.definit.co.uk
192.168.20.14   rpi4-03 rpi4-03.lab.definit.co.uk
Configuring kube-vip#
I’m using kube-vip to provide control plane load balancing on my Kubernetes cluster. The latest version is much simpler to configure, requiring very little configuration to get a basic setup working. It’s also got the option to use BGP for VIP failover rather than ARP, which I love - though I’ve not tested it yet.
# Generate the kube-vip manifest
sudo docker run --network host --rm plndr/kube-vip:0.1.8 kubeadm init \
--interface eth0 \
--vip 192.168.20.9 \
--arp \
--leaderElection | sudo tee /etc/kubernetes/manifests/vip.yaml

# Initialise the first node
sudo kubeadm init --control-plane-endpoint "192.168.20.9:6443" --upload-certs

# Join other control plane nodes to cluster - if the token has expired, use
kubeadm token create --print-join-command --certificate-key $(sudo kubeadm init phase upload-certs --upload-certs | tail -1)

# Generate the kube-vip manifest on additional nodes
sudo docker run --network host --rm plndr/kube-vip:0.1.8 kubeadm init \
--interface eth0 \
--vip 192.168.20.9 \
--arp \
--leaderElection | sudo tee /etc/kubernetes/manifests/vip.yaml
Network Plugin - Weave#
I’ve chosen Weave to provide the network plugin for my cluster based on my requirements - but generally I would recommend Flannel for a small cluster like this. There are loads of considerations when picking a CNI - things like does it have an arm-compatible image, and whether it works with metallb were two key ones! I really recommend looking at the ITNEXT benchmark results as well, there’s some really good information there.
Be sure to run this command on the RPi - if you run it on your laptop it’s very likely you’ll get the wrong architecture downloaded!
# Install Weave with NO_MASQ_LOCAL for metallb
sudo kubectl apply -f "https://cloud.weave.works/k8s/net?k8s-version=$(kubectl version | base64 | tr -d '\n')&env.NO_MASQ_LOCAL=1"
Load Balancing with MetalLb#
Last year I covered using MetalLb with Contour for ingress and load balancing, and since then I’ve moved my metallb configuration over to using BGP (layer3) to advertise load balanced VIPs to my EdgeRouter (rather than the ARP-based L2 load balancing). The installation process is really easy, install the manifests, and create a secret for encryption between nodes.
# Install metallb for ingress/load balancing
kubectl apply -f https://raw.githubusercontent.com/metallb/metallb/v0.9.3/manifests/namespace.yaml
kubectl apply -f https://raw.githubusercontent.com/metallb/metallb/v0.9.3/manifests/metallb.yaml
# On first install only
kubectl create secret generic -n metallb-system memberlist --from-literal=secretkey="$(openssl rand -base64 128)"
Once metallb is installed it will sit idle until you provide it with a configMap:
apiVersion: v1
kind: ConfigMap
metadata:
  namespace: metallb-system
  name: config
data:
  config: |
    peers:
    - peer-address: 192.168.20.1
      peer-asn: 65000
      my-asn: 65000
    address-pools:
    - name: default
      protocol: bgp
      avoid-buggy-ips: true
      addresses:
      - 192.168.21.0/24
      bgp-advertisements:
- aggregation-length: 32Storage#
From a storage perspective, I either use NFS (for persistent storage) or the local SSD (for more transient storage). Instead of creating a whole load of mount points on my Synology, I’m making use of the subPath property of my volumeMounts. I’m aware there are issues with using NFS around the number of connections created, but this is mitigated by the size of my cluster and the small number of persistent apps that are running.
e.g. below I have a single NFS PersistentVolume that is mounting three different subPath in the container…hmm I should switch the transcode to local SSD…
apiVersion: v1
kind: PersistentVolume
metadata:
  name: plex-system-pvc
  namespace: plex
  labels:
    app.kubernetes.io/name: plex-media-server
    app.kubernetes.io/instance: definit-plex
spec:
  capacity:
    storage: 100Gi
  accessModes:
    - ReadWriteMany
  persistentVolumeReclaimPolicy: Retain
  nfs:
    server: 192.168.4.10
    path: /volume1/kubernetes

---
<snip>
          volumeMounts:
            - name: system
              mountPath: /config
              subPath: plex/config
            - name: system
              mountPath: /transcode
              subPath: plex/transcode
            - name: system
              mountPath: /shared
              subPath: plex/shared
      volumes:
        - name: system
          persistentVolumeClaim:
            claimName: "plex-system-pvc"
</snip>
So - that’s a summary, more or less, of my current configuration and a little bit of how I got here. I hope you’ve found it interesting, and I’d love to hear a bit more about your setup!