So, you’ve set up your shiny new Workload Management on vSphere, created a Namespace and deployed a cluster…now what?! When you deploy a workload cluster from Workload Management on vSphere 7, it comes with basic functionality, but in order to start running workloads you will inevitably need to install additional tools. That’s where Tanzu’s Packages come into play.
Tanzu’s User Managed Packages are based on a project called Carvel which:
provides a set of reliable, single-purpose, composable tools that aid in your application building, configuration, and deployment to Kubernetes
Out of the box, the Tanzu Package repository has packages for cert-manager, multus-cni, harbor, contour, fluent-bit, grafana, prometheus, and external-dns. I’m interested in a few of these to start with -
- Ingress control using
contour, specifically I want to limit the need for LoadBalancer IPs by using host rules to steer traffic based on DNS host names, and to use TLS to access workloads exposed throughingressobjects - Certificate managment using
cert-manager, to automatically sign TLS certificates for my workloads - Service discovery using external-dns, to register the
ingresshost names automatically with Active Directory DNS
My Tanzu Kubernetes Grid service (TKGs) on vSphere 7 is configured to use NSX-T to provide load balancing, but you could just as easily do this using NSX Advanced Load Balancer (Avi) or using HA-Proxy as the load balancer. You can do this on Tanzu Kubernetes Grid multi-cloud (TKGm) too, and if you’ve got Tanzu Mission Control you can deploy the Packages using that.
What if you’ve not got access to Tanzu Kubernetes Grid multi-cloud or services? These packages are also available as part of Tanzu Community Edition - for free…
Pre-requisites for TKG Packages#
I’m going to assume you’ve got a TKG cluster deployed, you have authenticated using the kubectl vsphere login commands and your current kubctl context is set to the cluster you’re working on. You’ll also need to have the Tanzu CLI installed.
Before anything is deployed, you need to configure a storage class as default - I’m going to set vsan-default-storage-policy as mine.
# Set the default storage class
$ kubectl patch storageclass vsan-default-storage-policy -p '{"metadata": {"annotations":{"storageclass.kubernetes.io/is-default-class":"true"}}}'
In order to run privileged pods on TKGs workload clusters, the [pod security policy needs to be updated](Using Pod Security Policies with Tanzu Kubernetes Clusters). The command below allows privileged workloads to run cluster wide - to restrict this privilege use a RoleBinding for specific namespaces and serviceaccounts.
$ kubectl create clusterrolebinding default-tkg-admin-privileged-binding --clusterrole=psp:vmware-system-privileged --group=system:authenticatedInstall the kapp-controller#
Part of Carvel is kapp, which allows you to bundle multiple kubernetes objects together into a single application definition, then deploy them in a dependency-aware fashion. The kapp-controller is a Kubernetes Controller that will watch the state of your cluster, then make or request changes where needed - reconciling the desired state defined in the kapp bundle with the current state on the cluster.
Create a new file kapp-controller.yaml and paste the manifest from the Tanzu Packages documentation.
# Deploy the kapp-controller manifest
$ kubectl apply -f kapp-controller.yaml
# Add the tanzu package repo
$ tanzu package repository add tkg-packages-1-4-0 --url projects.registry.vmware.com/tkg/packages/standard/repo:v1.4.0
# Check the repository has been installed and the STATUS is Reconcile succeeded
$ tanzu package repository list

Retrieving repositories...
  NAME                REPOSITORY                                                      STATUS               DETAILS
  tkg-packages-1-4-0  projects.registry.vmware.com/tkg/packages/standard/repo:v1.4.0  Reconcile succeeded
# List the available packages
$ tanzu package available list

- Retrieving available packages...
  NAME                           DISPLAY-NAME  SHORT-DESCRIPTION
  cert-manager.tanzu.vmware.com  cert-manager  Certificate management
  contour.tanzu.vmware.com       Contour       An ingress controller
  external-dns.tanzu.vmware.com  external-dns  This package provides DNS synchronization functionality.
  fluent-bit.tanzu.vmware.com    fluent-bit    Fluent Bit is a fast Log Processor and Forwarder
  grafana.tanzu.vmware.com       grafana       Visualization and analytics software
  harbor.tanzu.vmware.com        Harbor        OCI Registry
  multus-cni.tanzu.vmware.com    multus-cni    This package provides the ability for enabling attaching multiple network interfaces to pods in Kubernetes
prometheus.tanzu.vmware.com prometheus A time series database for your metrics Install Cert Manager#
The first package I’m going to install is cert-manager, which provides “certificates as a service” inside of Kubernetes. I’m going to install a CA certificate generated on my local machine to sign certificates, since the DNS domain I’m using (cmbu.local) is not public. This means I can trust the CA created on my local machine to produce valid certificates for me - this is obviously not something you’d do in a production environment!
# First, identify the latest version of the cert-manager package
tanzu package available list cert-manager.tanzu.vmware.com -A

Retrieving package versions for cert-manager.tanzu.vmware.com...
  NAME                           VERSION               RELEASED-AT           NAMESPACE
  cert-manager.tanzu.vmware.com  1.1.0+vmware.1-tkg.2  2020-11-24T18:00:00Z  default

# Next, install the package using the tanzu cli (this will install the package itself in the default
# namespace, and create the cert-manager namespace)
tanzu package install cert-manager --package-name cert-manager.tanzu.vmware.com --version 1.1.0+vmware.1-tkg.2 --create-namespace

# Once installed, we can check cert-manager is running as expected
kubectl get all -n cert-manager

READY   STATUS    RESTARTS   AGE
pod/cert-manager-5d98fc96c-ps88n               1/1     Running   0          42s
pod/cert-manager-cainjector-569d88547f-p6rqs   1/1     Running   0          42s
pod/cert-manager-webhook-79fd9fcbf-j6tvs       1/1     Running   0          42s

NAME                           TYPE        CLUSTER-IP      EXTERNAL-IP   PORT(S)    AGE
service/cert-manager           ClusterIP   10.106.223.54   <none>        9402/TCP   42s
service/cert-manager-webhook   ClusterIP   10.102.63.18    <none>        443/TCP    43s

NAME                                      READY   UP-TO-DATE   AVAILABLE   AGE
deployment.apps/cert-manager              1/1     1            1           44s
deployment.apps/cert-manager-cainjector   1/1     1            1           44s
deployment.apps/cert-manager-webhook      1/1     1            1           44s

NAME                                                 DESIRED   CURRENT   READY   AGE
replicaset.apps/cert-manager-5d98fc96c               1         1         1       44s
replicaset.apps/cert-manager-cainjector-569d88547f   1         1         1       44s
replicaset.apps/cert-manager-webhook-79fd9fcbf 1 1 1 44s- Ref: Install Cert Manager
Configuring CA signed certificates#
To create the CA certificates, I followed the steps documented by Jorge Morales Pou here - Create your own local CA, and exported the private key as noted by Cormac Hogan here.
$ openssl rsa -in autotmm-ca.key -out autotmm-ca.unprotected.key

# Create a TLS secret in the cert-manager namespace
$ kubectl create secret tls autotmm-ca-secret --key autotmm-ca.unprotected.key --cert autotmm-ca.pem -n cert-manager
Next create a ClusterIssuer manifest to use the CA secret, and deploy kubectl apply ca-issuer.yaml:
apiVersion: cert-manager.io/v1
kind: ClusterIssuer
metadata:
  name: autotmm-issuer
  namespace: cert-manager
spec:
  ca:
    secretName: autotmm-ca-secret
Install Contour#
At this point cert-manager should be ready to issue certificates, so we can install contour to begin consuming them. I’ve created contour-data-values.yaml based on the “workload cluster with NSX ALB” example to contain the configuration for the contour deployment, which will customize the package deployment to use a LoadBalancer for Envoy.
infrastructure_provider: vsphere
namespace: tanzu-system-ingress
contour:
 configFileContents: {}
 useProxyProtocol: false
 replicas: 2
 pspNames: "vmware-system-restricted"
 logLevel: info
envoy:
 service:
   type: LoadBalancer
   annotations: {}
   nodePorts:
     http: null
     https: null
   externalTrafficPolicy: Cluster
   disableWait: false
 hostPorts:
   enable: false
   http: 80
   https: 443
 hostNetwork: false
 terminationGracePeriodSeconds: 300
 logLevel: info
 pspNames: null
certificates:
 duration: 8760h
 renewBefore: 360h
With this configuration file we can deploy Contour into the cluster
# Identify the latest version of contour
$ tanzu package available list contour.tanzu.vmware.com -A

\ Retrieving package versions for contour.tanzu.vmware.com...
  NAME                      VERSION                RELEASED-AT           NAMESPACE
  contour.tanzu.vmware.com  1.17.1+vmware.1-tkg.1  2021-07-23T18:00:00Z  default

# Next, install the package using the tanzu cli (this will install the package itself in the default
# namespace, and create the tanzu-system-ingress namespace)
tanzu package install contour --package-name contour.tanzu.vmware.com --version 1.17.1+vmware.1-tkg.1 --values-file contour-data-values.yaml --create-namespace

# Check the deployment
$ kubectl get all -n tanzu-system-ingress

NAME                          READY   STATUS    RESTARTS   AGE
pod/contour-cd965689f-9p4jh   1/1     Running   0          5h2m
pod/contour-cd965689f-gmm27   1/1     Running   0          5h2m
pod/envoy-67xzt               2/2     Running   0          5h2m
pod/envoy-vq49r               2/2     Running   0          5h2m
pod/envoy-x9qt4               2/2     Running   0          5h2m

NAME              TYPE           CLUSTER-IP       EXTERNAL-IP      PORT(S)                      AGE
service/contour   ClusterIP      10.106.131.103   <none>           8001/TCP                     5h2m
service/envoy     LoadBalancer   10.109.244.41    10.176.149.101   80:30508/TCP,443:32580/TCP   5h2m

NAME                   DESIRED   CURRENT   READY   UP-TO-DATE   AVAILABLE   NODE SELECTOR   AGE
daemonset.apps/envoy   3         3         3       3            3           <none>          5h2m

NAME                      READY   UP-TO-DATE   AVAILABLE   AGE
deployment.apps/contour   2/2     2            2           5h2m

NAME                                DESIRED   CURRENT   READY   AGE
replicaset.apps/contour-cd965689f 2 2 2 5h2mExternal DNS#
The final step in linking this all together is configuring external-dns to register and manage DNS records for the ingress objects created in contour. Since I’m using Active Directory DNS servers, I need to configure kerberos authentication to make use of RFC3645 for secure updates.
DNS-side configuration
- Create a DNS zone
- Enable secure dynamic updates for the zone
- Enable Zone Transfers to all servers
First, create the external-dns-kerberos.yaml, updating to match your AD Domain:
apiVersion: v1
kind: ConfigMap
metadata:
  creationTimestamp: null
  name: krb5.conf
  namespace: tanzu-system-service-discovery
data:
  krb5.conf: |
    [logging]
    default = FILE:/var/log/krb5libs.log
    kdc = FILE:/var/log/krb5kdc.log
    admin_server = FILE:/var/log/kadmind.log

    [libdefaults]
    dns_lookup_realm = false
    ticket_lifetime = 24h
    renew_lifetime = 7d
    forwardable = true
    rdns = false
    pkinit_anchors = /etc/pki/tls/certs/ca-bundle.crt
    default_ccache_name = KEYRING:persistent:%{uid}

    default_realm = CMBU.LOCAL

    [realms]
    CMBU.LOCAL = {
      kdc = domaincontroller.cmbu.local
      admin_server = domaincontroller.cmbu.local
    }

    [domain_realm]
    cmbu.local = CMBU.LOCAL
    .cmbu.local = CMBU.LOCAL
Because I need the kerberos configuration to be present before deploying external-dns, I create the namespace and deploy the kerberos configmap:
$ kubectl create namespace tanzu-system-service-discovery
$ kubectl apply -f external-dns-kerberos.yaml
Next, create a package configuration YAML external-dns-data-values.yaml to configure the package. This example is specific for Microsoft DNS, to configure for other DNS providers check the external-dns docs! The key things to note here are the three source types - this means external-dns will register DNS for services, ingresses and httpproxies.
namespace: tanzu-system-service-discovery
deployment:
  args:
    - --provider=rfc2136
    - --rfc2136-host=cmbu-wdcdc-02.cmbu.local
    - --rfc2136-port=53
    - --rfc2136-zone=cmbu.local
    - --rfc2136-kerberos-realm=cmbu.local
    - --rfc2136-kerberos-username=service-account
    - --rfc2136-kerberos-password=VMware1!
    - --rfc2136-tsig-axfr
    - --rfc2136-insecure
    - --source=service
    - --source=ingress
    - --source=contour-httpproxy
    - --domain-filter=cmbu.local
    - --txt-owner-id=k8s
    - --txt-prefix=external-dns-
    - --registry=txt
    - --policy=upsert-only
  env: []
  securityContext: {}
  volumeMounts:
  - name: kerberos-config-volume
    mountPath: /etc/krb5.conf
    subPath: krb5.conf
  volumes:
  - name: kerberos-config-volume
    configMap:
      defaultMode: 420
      name: krb5.conf
Finally, I can deploy the package!
# Get the latest package
$ tanzu package available list external-dns.tanzu.vmware.com -A

| Retrieving package versions for external-dns.tanzu.vmware.com...
  NAME                           VERSION               RELEASED-AT           NAMESPACE
  external-dns.tanzu.vmware.com  0.8.0+vmware.1-tkg.1  2021-06-11T18:00:00Z  default

# Next, install the package using the tanzu cli (this will install the package itself in the default
# namespace, and create the tanzu-system-service-discovery namespace)
tanzu package install external-dns --package-name external-dns.tanzu.vmware.com --version 0.8.0+vmware.1-tkg.1 --values-file external-dns-data-values.yamlPutting it all together#
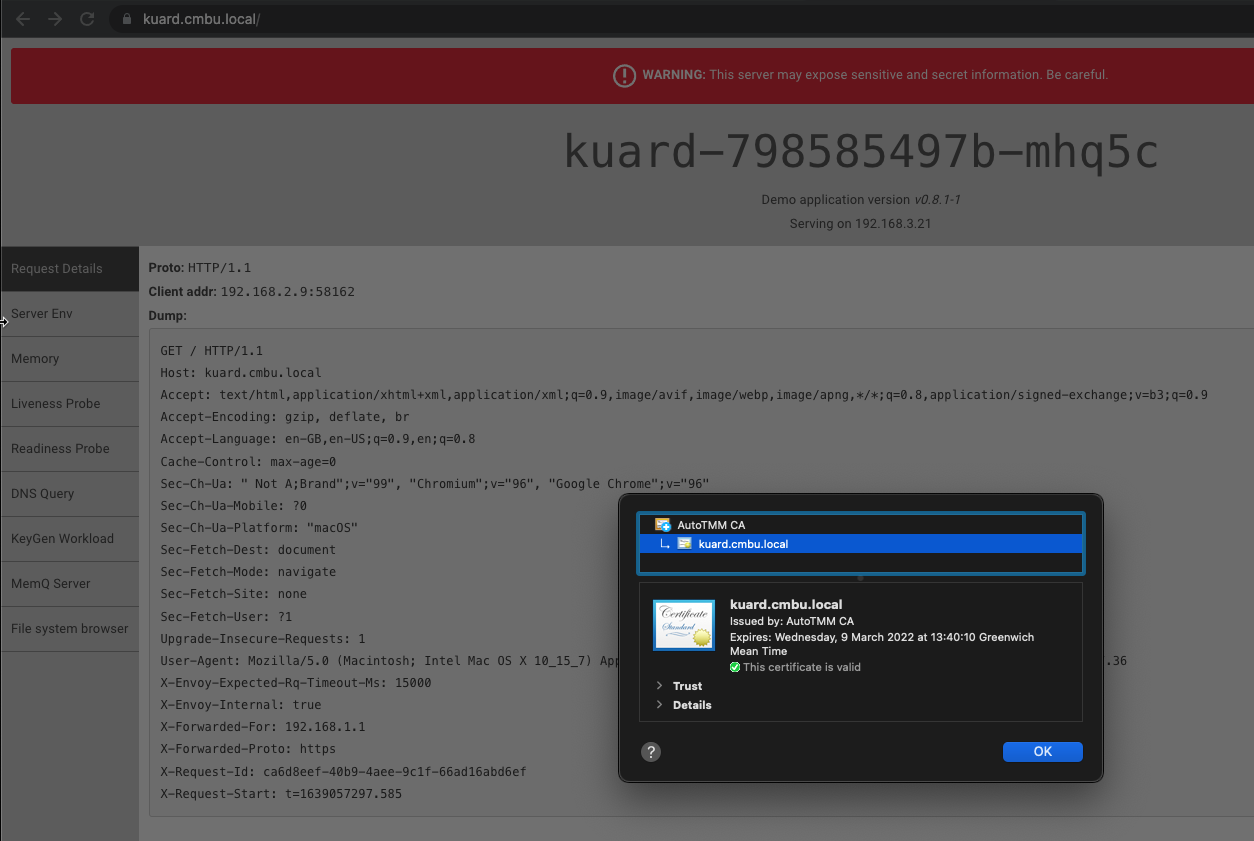
With this configuration I can now deploy an application and have that application URL be auto-magically signed with an SSL certificate using cert-manager, contour will steer traffic to the correct service based on the URL, and the DNS name of that service will be automatically registered in DNS!
The below manifest for Kubernetes Up And Running Demo app (KUARD) is all pretty standard - the magic happens when we call the ingress object. Firstly, the annotation to use the CA issuer configuration cert-manager.io/cluster-issuer: "autotmm-issuer" and the tls configuration block means that Contour will request an SSL certificate from Cert Manager. External DNS will pick up the host: kuard.cmbu.local value and register it in DNS.
apiVersion: apps/v1
kind: Deployment
metadata:
  labels:
    app: kuard
  name: kuard
spec:
  replicas: 3
  selector:
    matchLabels:
      app: kuard
  template:
    metadata:
      labels:
        app: kuard
    spec:
      containers:
      - image: gcr.io/kuar-demo/kuard-amd64:1
        name: kuard
---
apiVersion: v1
kind: Service
metadata:
  labels:
    app: kuard
  name: kuard
spec:
  ports:
  - port: 80
    protocol: TCP
    targetPort: 8080
  selector:
    app: kuard
  sessionAffinity: None
  type: ClusterIP
---
apiVersion: networking.k8s.io/v1
kind: Ingress
metadata:
  name: kuard
  annotations:
    kubernetes.io/ingress.class: "contour"
    cert-manager.io/cluster-issuer: "autotmm-issuer"
spec:
  defaultBackend:
    service:
      name: kuard
      port:
        number: 80
  rules:
  - host: kuard.cmbu.local
    http:
      paths:
      - path: /
        pathType: Prefix
        backend:
          service:
            name: kuard
            port:
              number: 80
  tls:
  - hosts:
    - kuard.cmbu.local
    secretName: kuard-cert
$ kubectl apply -f kuard.yml
deployment.apps/kuard created
service/kuard created
ingress.networking.k8s.io/kuard created
# View the created objects
$ kubectl get pod,service,deployment,ingress
NAME READY STATUS RESTARTS AGE
pod/kuard-798585497b-7n72x 1/1 Running 0 3h40m
pod/kuard-798585497b-mhq5c 1/1 Running 0 3h40m
pod/kuard-798585497b-q55v8 1/1 Running 0 3h40m
NAME TYPE CLUSTER-IP EXTERNAL-IP PORT(S) AGE
service/kuard ClusterIP 10.104.230.69 <none> 80/TCP 3h40m
service/kubernetes ClusterIP 10.96.0.1 <none> 443/TCP 2d5h
service/supervisor ClusterIP None <none> 6443/TCP 2d5h
NAME READY UP-TO-DATE AVAILABLE AGE
deployment.apps/kuard 3/3 3 3 3h40m
NAME CLASS HOSTS ADDRESS PORTS AGE
ingress.networking.k8s.io/kuard <none> kuard.cmbu.local 10.176.149.101 80, 443 3h40mLets check the DNS registration
$ nslookup

> kuard.cmbu.local

Server:         10.16.142.68
Address:        10.16.142.68#53

Non-authoritative answer:
Name:   kuard.cmbu.local
Address: 10.176.149.101

> set type=txt
> external-dns-kuard.cmbu.local

Server:         10.16.142.68
Address:        10.16.142.68#53

Non-authoritative answer:
external-dns-kuard.cmbu.local   text = "heritage=external-dns,external-dns/owner=k8s,external-dns/resource=HTTPProxy/default/kuard"