

This is the fourth post in my Vault Secrets in Kubernetes series. Previously, I set up the Vault Secrets Operator (VSO) with Kubernetes authentication and used the Transit secrets engine to encrypt VSO’s client cache; in Rotating Static Secrets I looked at what happens to a workload when a secret changes underneath it; and in Dynamic Database Credentials Vault started generating short-lived Postgres credentials on demand.
My lab cluster is three Dell OptiPlex 7040 small form factor machines running k3s, with Cilium for networking, Argo CD and Flux for GitOps, and persistent storage provided by Longhorn, and NFS exports from my TrueNAS server. Vault is deployed from the official Helm chart as a three-node high availability cluster using integrated Raft storage, so vault-0, vault-1 and vault-2 each hold a full copy of the data, with one acting as the leader and the other two as standbys ready to take over. VSO sits alongside it, syncing static and dynamic secrets into native Kubernetes secrets so that the applications on the cluster don’t need to know Vault exists at all.
All of this works brilliantly, but it also assumes Vault is up and unsealed. The problem is that every time a Vault pod restarts it comes back sealed, and a sealed Vault can’t read its own data until someone unseals it. By design, Kubernetes pods are treated as transient and so whenever something changes the pods are simply killed and recreated. And in a home lab, where changes are a daily occurrence, they restart a lot! Whether that’s for node updates, the occasional power cut, or because I’ve broken something (again), each time it requires me digging out the unseal keys and unsealing each pod by hand. Until I do, VSO can’t refresh anything and any workload that needs a new secret is left waiting.
In this post I’ll try to explain why Vault starts sealed at all, and why the default Shamir seal is a poor fit for a cluster like mine that restarts often. Then we’ll look at how I moved the cluster to auto-unseal using a second Vault instance and the Transit secrets engine, including migrating the existing cluster from Shamir to Transit without re-initialising it.
Why Vault starts sealed#
Backend storage is untrusted. Everything Vault writes to its storage backend is therefore encrypted, and it helps to think of that encryption as three layers. Your data is encrypted with the keyring (Vault’s barrier encryption keys), the keyring is encrypted with the root key, and the root key is protected by the seal. The seal lives outside of Vault. When a Vault node starts it can read the encrypted root key from storage, but it has no way to decrypt it, so it can’t decrypt the keyring and can’t read any of your data. That is the sealed state, and unsealing is simply the process of getting the unencrypted root key back into memory.
If someone were to steal your Vault server’s data, it’s encrypted. If they were to clone a virtual machine or even steal a physical server, the data would still be encrypted.
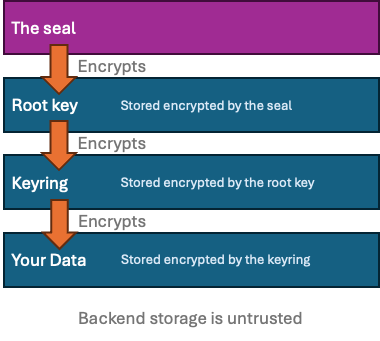
Each layer of the encryption exists so you can change one layer without having to redo everything beneath it. The analogy that helps me to understand it is that of a building with lots of locked rooms.
- Your data is in the rooms, and each room is protected by a locked door. The keyring is a bunch of keys that open each door. When you change the locks, you add a new key to the bunch rather than throwing the old ones away, so new data uses the new key and old data can still be read. Nothing has to be re-encrypted.
- The keyring (your bunch of keys) sits in a safe, and the root key opens the safe. When the keyring changes, only the safe’s contents change. The root key stays the same.
- The root key is in a lockbox, and the seal is how the lockbox gets opened. If you change how the lockbox opens, you only re-lock that one small root key. The safe, the keyring and every room stay as they are.
If there were only one key protecting all the data directly, every change would mean re-encrypting everything Vault holds.
The seal is the only layer that differs between Shamir and auto-unseal; everything underneath works the same way regardless of which seal you use, which is also why it’s possible to migrate an existing cluster from one seal type to another without touching the data. Vault takes the root key out of the Shamir lockbox and puts it into a Transit one, and nothing below that layer notices.
Shamir, and why it hurts in a home lab#
By default, Vault uses Shamir’s Secret Sharing. When you run vault operator init, Vault generates an unseal key, uses it to encrypt the root key, and then splits the unseal key into a number of shares (five by default) along with a threshold (three by default) that must be provided to reconstruct it. The unseal key itself is discarded, so no single person or file holds enough to unseal Vault, and any number of shares below the threshold reveals nothing about the key.
For an organisation with several key holders that is exactly the property you want. The catch is that unsealing happens per node and per start: every Vault pod, every time it starts, needs the threshold of shares submitted with vault operator unseal before it can serve a single request. On my cluster that means three pods and three keys each, every time a node is drained for an update or the power blips, which adds up to a lot of copying and pasting of keys that really ought to be kept somewhere inconvenient.
Choosing an auto-unseal method#
Auto-unseal replaces the human key holders with a trusted external service. Instead of protecting the root key with a Shamir unseal key, Vault sends the root key to the external service to be encrypted when the cluster is initialised, stores the ciphertext, and sends it back to be decrypted every time a node starts. In the cloud that service would normally be a KMS such as AWS KMS, Azure Key Vault or Google Cloud KMS, and Vault Enterprise can also use an HSM.
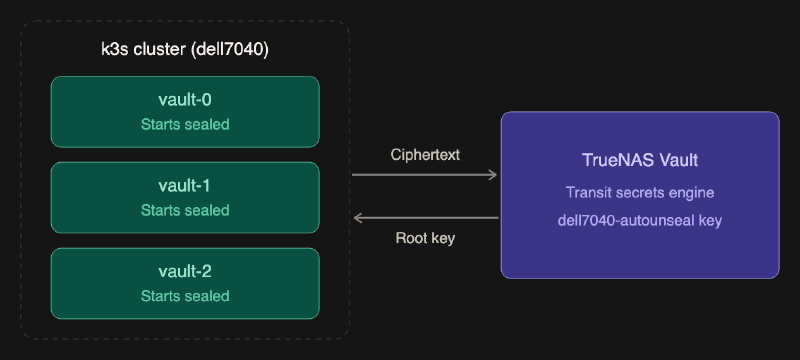
I want to keep this local, and the option that doesn’t depend on a cloud account or extra hardware is the Transit seal, which uses the Transit secrets engine on another Vault instance to do the encryption and decryption. The Transit engine provides encryption as a service: it holds a named key that never leaves Vault, and exposes encrypt and decrypt endpoints that a client can call if its policy allows it. It’s the same engine I used for VSO’s client cache encryption in the first post, just running on a different Vault.
That second Vault runs on my TrueNAS server as a single-node Docker container. It doesn’t remove manual unsealing entirely, because the TrueNAS Vault still needs unsealing, but it moves the manual step from three pods on a cluster that restarts often to one instance on a box that rarely restarts.
Setting up the transit Vault on TrueNAS#
TrueNAS Community Edition runs container workloads through its built-in Apps feature, and if the app you want isn’t in their catalogue you can deploy it using Docker Compose YAML instead. There’s no Vault app in the catalogue, so I’ve deployed a single-node Vault that way. I’m not going to cover the deployment itself here; all that matters for this post is that it’s initialised, unsealed, and reachable from the cluster at https://truenas.lab.definit.co.uk:30504.
Logged in to the TrueNAS Vault with an admin token, the first step is to enable the Transit engine and create a key for the cluster to use. I’ve named the key after the cluster so it’s obvious what it belongs to if I add others later.
# TrueNAS Vault instance

# Enable the transit secrets engine
vault secrets enable transit

# Write a new key
vault write -f transit/keys/dell7040-autounseal
The -f flag forces the write without any data, which creates the key with the default type of aes256-gcm96.
My Kubernetes Vault cluster only ever needs to encrypt and decrypt with that one key, so we create a policy that grants update on those two paths and nothing else. The Transit endpoints are write operations, which is why the capability is update rather than read.
# TrueNAS Vault instance

vault policy write dell7040-autounseal - <<EOF
# Allow encrypting data with the autounseal key
path "transit/encrypt/dell7040-autounseal" {
  capabilities = ["update"]
}

# Allow decrypting data with the autounseal key
path "transit/decrypt/dell7040-autounseal" {
  capabilities = ["update"]
}
EOF
Creating the unseal token#
The Kubernetes Vault cluster authenticates to the TrueNAS Vault with a token bound to the policy we just created. There are a few important properties I need when creating that token, set by flags when I run vault token create:
-period 24hmakes it a periodic token, which has no maximum TTL and lives for as long as it’s renewed within each 24 hour period. Vault renews the seal token itself, so there’s no cron job to maintain.-orphangives it no parent, so revoking the admin token that created it doesn’t cascade and take the unseal token with it.-wrap-ttl=120returns a single-use wrapping token, valid for 120 seconds, instead of the token itself.
Response wrapping is arguably overkill when I’m creating and consuming the token in the same terminal, but it keeps the real token out of the command output, and because a wrapping token can only be unwrapped once, I’d know if anything else had got to it first. The second command unwraps it, and the third stores it as a Kubernetes secret in the vault namespace where the Vault pods can read it.
# TrueNAS Vault instance

export VAULT_WRAPPED_TOKEN=$(vault token create -policy=dell7040-autounseal -period 24h -orphan -wrap-ttl=120 -field=wrapping_token)

export VAULT_UNSEAL_TOKEN=$(vault unwrap -field=token $VAULT_WRAPPED_TOKEN)

kubectl create secret generic vault-unseal-token -n vault --from-literal=VAULT_TOKEN="$VAULT_UNSEAL_TOKEN"
Periodic token expiry
A periodic token only survives if it’s renewed within its period. If the whole cluster is powered off for longer than 24 hours, nothing renews the token, it expires, and the Vault pods won’t be able to unseal when they come back. Recovering from that means creating a new token, updating the vault-unseal-token secret and restarting the pods, so if your lab is likely to be switched off for a long weekend, a longer period is worth considering.
Configuring the Helm chart#
The Transit seal will read its token from the VAULT_TOKEN environment variable when one isn’t set in the configuration, which keeps the token out of both the Helm values and the Vault config file. The chart’s extraSecretEnvironmentVars setting maps the Kubernetes secret into that variable on each Vault pod:
server:
  extraSecretEnvironmentVars:
    - envName: VAULT_TOKEN
      secretName: vault-unseal-token
      secretKey: VAULT_TOKEN
Then the seal "transit" stanza is added to the Vault server configuration, which for an HA Raft deployment lives in server.ha.raft.config alongside the existing listener and storage blocks. The address points at the TrueNAS Vault, and the mount_path and key_name match the engine and key created earlier.
server:
  ha:
    raft:
      config: |
        # ...existing listener and storage blocks...

        # Transit auto-unseal configuration
        seal "transit" {
          address         = "https://truenas.lab.definit.co.uk:30504" # The TrueNAS Vault
          tls_skip_verify = true                                      # See the warning below
          mount_path      = "transit"                                 # Where the Transit engine is mounted
          key_name        = "dell7040-autounseal"                     # The key created for this cluster
        }
tls_skip_verify
I’ve set tls_skip_verify = true because the TrueNAS Vault is currently using a certificate the cluster doesn’t trust. That means the cluster isn’t verifying who it’s sending its root key to, which is acceptable for getting this working in a lab but not something to leave in place. The better option is to mount the CA certificate into the Vault pods and point tls_ca_cert at it, which is next on my list.
Apply the updated values with helm upgrade (or commit them, if the chart is managed through GitOps). Nothing visible happens yet, and that’s expected (more on why in a moment).
Migrating from Shamir to Transit#
My Kubernetes Vault cluster was initialised with Shamir and already holds data, so rather than re-initialising it (and losing everything in it) it needs a seal migration. When a node starts with a seal configuration that doesn’t match the seal type recorded in storage, it enters seal migration mode and has to be unsealed one last time using the existing Shamir keys and the -migrate flag. In an HA cluster the migration itself is carried out by the active node, so you migrate the standbys first, then move leadership onto one of them.
The Vault Helm chart deploys the StatefulSet with an OnDelete update strategy, so the pods don’t restart when the configuration changes. Each pod only picks up the new seal configuration when you delete it, which means you get to control the order.
Start by checking which node is currently the leader:
vault operator raft list-peers
Node       Address                        State       Voter
----       -------                        -----       -----
vault-1    vault-1.vault-internal:8201    follower    true
vault-0    vault-0.vault-internal:8201    follower    true
vault-2    vault-2.vault-internal:8201    leader      true
vault-2 is the leader, so vault-0 and vault-1 are the standbys and get migrated first. Deleting vault-0 makes the StatefulSet recreate it with the new configuration, and it comes back sealed and in migration mode. Running vault operator unseal -migrate without a key argument prompts for the share, which keeps the keys out of your shell history; run it once per share until the threshold is reached, which is three times in my case.
kubectl delete pod -n vault vault-0

# Run once per share until the threshold is reached
kubectl -n vault exec -it vault-0 -- vault operator unseal -migrate
Then the same again for vault-1:
kubectl delete pod -n vault vault-1

# Run once per share until the threshold is reached
kubectl -n vault exec -it vault-1 -- vault operator unseal -migrate
VAULT_TOKEN inside the Vault pods
Because the unseal token is injected into the pods as VAULT_TOKEN, any vault CLI command you run with kubectl exec inside a Vault pod will try to authenticate with it, and it isn’t a valid token on the cluster’s own Vault. vault operator unseal doesn’t need a token, so the migration steps are unaffected, but run vault operator step-down from your workstation or override the variable with an admin token for that one command.
With both standbys migrated, the leader steps down and one of the migrated standbys takes over:
vault operator step-down

vault operator raft list-peers
Node       Address                        State       Voter
----       -------                        -----       -----
vault-1    vault-1.vault-internal:8201    leader      true
vault-0    vault-0.vault-internal:8201    follower    true
vault-2    vault-2.vault-internal:8201    follower    true
When vault-1 becomes active it finds itself in migration mode and performs the migration, re-encrypting the root key using the Transit seal. The logs on the new leader show the whole sequence, from entering migration mode, through the three unseal attempts, to the migration completing:
kubectl logs -n vault vault-1 | grep -i "seal"
2026-11-04T12:54:31.445Z [INFO]  incrementing seal generation: generation=1
2026-11-04T12:54:31.446Z [WARN]  core: entering seal migration mode; Vault will not automatically unseal even if using an autoseal: from_barrier_type=shamir to_barrier_type=transit
2026-11-04T12:54:46.962Z [INFO]  core: unsealing using migration seal
2026-11-04T12:54:47.046Z [INFO]  core: unsealing using migration seal
2026-11-04T12:54:47.154Z [INFO]  core: unsealing using migration seal
2026-11-04T12:54:47.158Z [INFO]  core: vault is unsealed
2026-11-04T12:55:28.704Z [INFO]  core: seal migration initiated: info="barrier seal config type in seal matches what's in storage"
2026-11-04T12:55:28.704Z [INFO]  core: migrating from shamir to auto-unseal: to=transit
2026-11-04T12:55:28.842Z [INFO]  core: seal migration complete
2026-11-04T12:55:28.868Z [INFO]  core: post-unseal setup starting
2026-11-04T12:55:28.905Z [INFO]  core: post-unseal setup complete
The WARN line on the second row explains why that last unseal had to be manual: in migration mode Vault deliberately won’t auto-unseal, even with a Transit seal configured, until the migration has completed.
Finally, delete the old leader. vault-2 comes back with the new configuration, finds a Transit seal recorded in storage, calls the TrueNAS Vault to decrypt its root key and unseals itself without any help from me:
kubectl delete pod -n vault vault-2

kubectl logs -n vault vault-2 | grep -i "seal"
2026-11-04T13:14:53.373Z [INFO]  incrementing seal generation: generation=1
2026-11-04T13:14:53.374Z [INFO]  core: stored unseal keys supported, attempting fetch
2026-11-04T13:14:53.386Z [INFO]  core: vault is unsealed
2026-11-04T13:14:53.489Z [INFO]  core: unsealed with stored key
Checking it worked#
Running vault status on any of the pods should now report a Seal Type of transit and a Recovery Seal Type of shamir, with Sealed set to false.
vault status
Key                      Value
---                      -----
Seal Type                transit
Recovery Seal Type       shamir
Initialized              true
Sealed                   false
Total Recovery Shares    5
Threshold                3
Version                  2.0.3
Build Date               2026-06-17T12:39:45Z
Storage Type             raft
Cluster Name             vault-cluster-09998987
Cluster ID               31d33a56-e55f-fedf-3973-613e96edee45
Removed From Cluster     false
HA Enabled               true
HA Cluster               https://vault-1.vault-internal:8201
HA Mode                  active
Active Since             2026-11-04T12:55:28.871204517Z
Raft Committed Index     261825
Raft Applied Index       261825
Migrating from Shamir to auto-unseal turns the existing unseal keys into recovery keys, and while they can no longer unseal Vault, they’re still required for privileged operations such as generating a new root token or rekeying, so they need to stay somewhere safe rather than being deleted as a relic of the old setup.
The real test is a restart, and the most convincing one is deleting all three pods at once and watching them come back unsealed with nobody touching a key.
kubectl delete pod -n vault vault-0 vault-1 vault-2
pod "vault-0" deleted from vault namespace
pod "vault-1" deleted from vault namespace
pod "vault-2" deleted from vault namespace

kubectl get pods -n vault
NAME                                    READY   STATUS              RESTARTS      AGE
vault-0                                 0/1     Running             0             10s
vault-1                                 0/1     ContainerCreating   0             14s
vault-2                                 0/1     ContainerCreating   0             14s
vault-agent-injector-6b5d99c686-wlwlw   1/1     Running             1 (41d ago)   103d

kubectl get pods -n vault
NAME                                    READY   STATUS    RESTARTS      AGE
vault-0                                 1/1     Running   0             3m55s
vault-1                                 1/1     Running   0             3m59s
vault-2                                 1/1     Running   0             3m59s
vault-agent-injector-6b5d99c686-wlwlw   1/1     Running   1 (41d ago)   103d

vault status
Key                      Value
---                      -----
Seal Type                transit
Recovery Seal Type       shamir
Initialized              true
Sealed                   false
Total Recovery Shares    5
Threshold                3
Version                  2.0.3
Build Date               2026-06-17T12:39:45Z
Storage Type             raft
Cluster Name             vault-cluster-09998987
Cluster ID               31d33a56-e55f-fedf-3973-613e96edee45
Removed From Cluster     false
HA Enabled               true
HA Cluster               https://vault-0.vault-internal:8201
HA Mode                  active
Active Since             2026-11-04T13:30:49.714273543Z
Raft Committed Index     261862
Raft Applied Index 261862Conclusion#
Moving the cluster to Transit auto-unseal has removed the manual part of running Vault on hardware that gets rebooted as often as mine does. A node update or a power cut now ends with the Vault pods coming back on their own and VSO carrying on where it left off, with no hunting around for keys, and the migration itself was a much smaller job than I expected once the OnDelete behaviour and the order of operations made sense.
There are trade-offs: the cluster now depends on the TrueNAS Vault. Pods that are already running stay unsealed if it goes offline, but any pod that restarts while it’s unavailable will stay sealed until it’s back. The TrueNAS Vault itself still uses Shamir, so there is still one manual unseal in the chain, on a single instance and a box that only restarts when I update it, which is a much better place for it but still a case of turtles all the way down. The unseal token also acts as a kill switch, because revoking it or disabling the dell7040-autounseal key stops the cluster from ever unsealing again, which is useful in an emergency and painful by accident. It also changes what a stolen node is worth: with Shamir, the Raft data on a node’s disk was useless on its own, but now the same node also holds the vault-unseal-token secret, and k3s doesn’t encrypt Secrets at rest unless it’s started with --secrets-encryption, so anyone with that disk and a route to the TrueNAS Vault could unseal the data.
For a home lab I think that’s a good trade. The next steps are fixing the tls_skip_verify shortcut properly with the TrueNAS Vault’s CA certificate, and turning that hand-rolled TrueNAS deployment into something more repeatable.