vCAC 6.0 build-out to distributed model – Part 3.1: Configure Load Balancing with vCNS
 Sam McGeown
- vCAC 6.0 build-out to distributed model – Part 4: Deploying and clustering a secondary vCAC Appliance
- vCAC 6.0 build-out to distributed model – Part 3.2: Configure load balancing with NSX
- vCAC 6.0 build-out to distributed model – Part 3.1: Configure Load Balancing with vCNS
- vCAC 6.0 build-out to distributed model – Part 2: vPostgres
- VCAC 6.0 build-out to distributed model – Part 1: Certificates
This is the first part of the 3rd article in a series about how to build-out a simple vCAC 6 installation to a distributed model.
By the end of this part, we will not have modified the vCAC deployment in any way, we’ll just have 3 configured load balanced URLs

vCAC simple configuration with vPostgres and Load Balancers prepared
An overview of the steps required are below:
- Issue and install certificates
- Deploy an external vPostgres appliance and migrate the vCAC database
- Configure load balancing
- Deploy a second vCAC appliance and configure clustering
- Install and configure additional IaaS server
- Deploy vCenter Orchestrator Appliance cluster
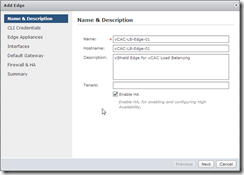
Deploy a vShield Edge appliance
Log in to your vShield Manager and select your Datacenter, then the Network Virtualisation tab

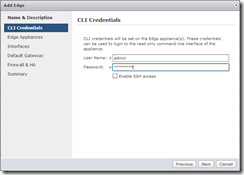
Click the green + symbol to add a new configuration, then give it a good name, hostname and description. Tick the “Enable HA” button to enable high availability. Configure the credentials and enable SSH access if required.
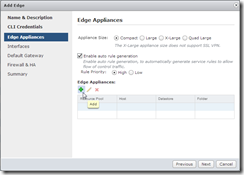
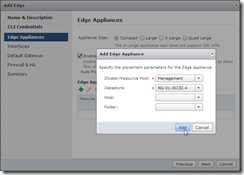
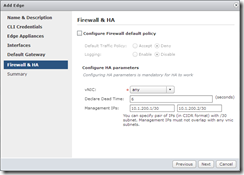
Select the appropriate size for your Edge Appliances, and ensure the auto rule generation is enabled – this creates rules allowing the vShield Manager to talk to the Edge device. Click on the green + to add an Edge device. Select a cluster or resource pool on which to run the Edge appliance, and a datastore to deploy to. You can specify a host and folder if you like.
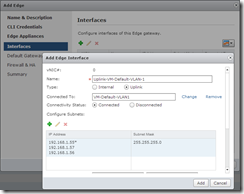
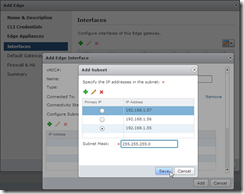
On the Interfaces page, click the green + to add a new interface and configure an Uplink to the Port Group on which you wish to load balance the vCAC deployment – for me that’s VM-Default-VLAN1. Click on the green + to configure the IP address and subnet for this interface. I’ve added 3 IP addresses to enable me to create 3 load balanced URLs.
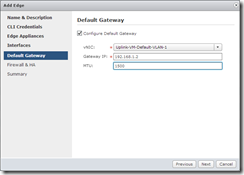
Configure a default gateway for the Uplink interface (this isn’t strictly necessary since I’m not routing, but I like to configure it anyway). Leave the MTU at 1500 unless you plan to use VXLAN at some point, then you need to set it to 1600. Leave the Firewall policy as is (since we’re just wanting a Load Balancer) and enter a pair of IP addresses for the Clustered Edge Gateways to talk to each other.
Finish the Wizard and wait for the Edge appliances to deploy…


Configuring DNS for load balancing
We require three DNS aliases for the load balanced services, one for the vCAC appliances, one for the IaaS web components and one for the IaaS Manager Service. If you’re creating certificates for vCAC and choose to use the SAN based certificate, you’ll need to make sure these DNS names are in the SAN list.
vCAC Appliance: since this is the main user interface, I’m going with vcloud.definit.local
vCAC IaaS Web: this is a system URL, so I will go with vcac-web.definit.local
vCAC IaaS Manager Service: another system URL, so vcac-manager.definit.local
Create A records and PTRs for all 3, using the IPs created earlier for the Edge appliance:

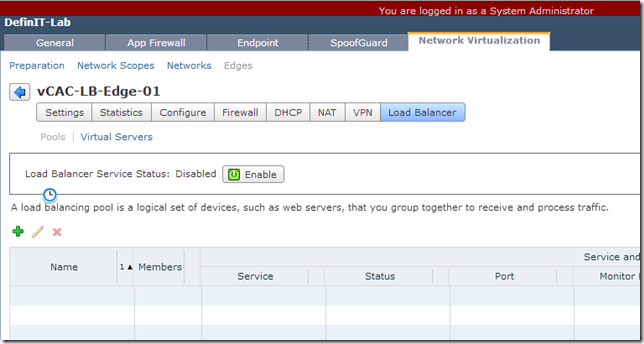
Configure Load Balancing pools
Jump back onto the vShield Manager web interface and double click on the Edge appliance you deployed previously. Click on the Load Balancer button to configure Load Balancing
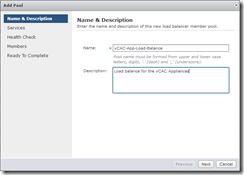
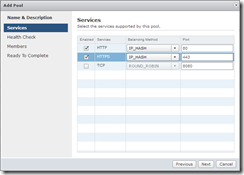
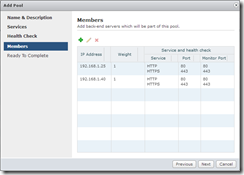
Click on the green + symbol to add a new pool of servers to load balance. Enter a name for the pool (e.g. vCAC-App-Load-Balance) and click next. For the vCAC appliances we need to load balance port 80 and 443. It is CRITICAL that you use the IP_HASH Balancing Method.
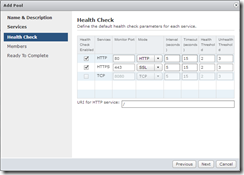
The health check can be left as the default checks, this will suffice. Next, click the green + to add the IP addresses for the vCAC Appliances – if you’re following this guide for a build-out then we’ve not deployed a 2nd vCAC appliance yet – that’s fine, just enter the IP address you plan to use for the second appliance.
Finish the wizard. At this point I also configure the other two load balancers -
vCAC-Web-Load-Balancer, HTTP, HTTPS using IP_HASH, default checks and the IP addresses of my two IaaS Web Servers
vCAC-Manager-Load-Balancer, HTTP, HTTPS using IP_HASH, default checks and the IP addresses of my two IaaS Manager Servers
At this point, make sure you hit the “Publish Changes” button at the top!
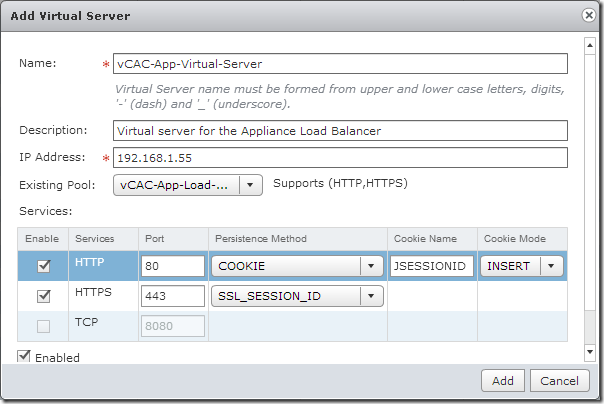
Configure Virtual Servers
Now we’ve configured the pools we can move on to the virtual servers – the “listening” part of the Load Balancers. Click on the Virtual Servers link under Load Balancer and click the green + to create a new Virtual Server.
Configure all three Virtual Servers to use the IP addresses we added to DNS earlier, using COOKIE persistence for HTTP and SSL_SESSION_ID for HTTPS. Select the existing pool we created in the previous step, making sure they match the load balanced service.
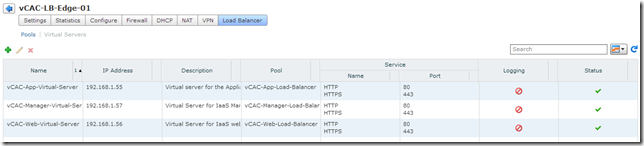
Publish your changes – you should now have 3 virtual servers:
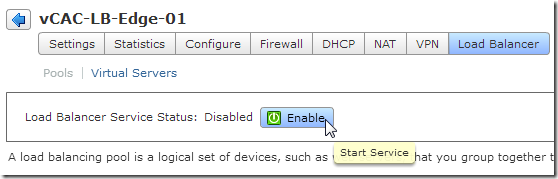
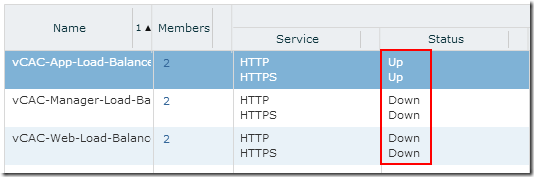
Click back on Pools and enable the Load Balancer service, and publish changes.
Once the configuration has published, you should see the status change, only the vCAC Appliance load balancer is up because that’s the only service we have available at the moment. If you click on the members you will see that only one of the appliances is up.
And that’s it for this part! vCNS is now configured to load balance the vCAC environment. Stay tuned for the next part where we’ll deploy the second appliance and cluster it with the first!